Occasionally the odd craving will hit me. Such as having a bowl of blistered cherry tomatoes for breakfast. Why? I have not a clue. It felt very British of me. Paired with the salty bursts of flavor and crunchy bites from the bacon, I must say, I have no regrets.
the recipe is my own
serves 1
The Ingredients:
1 slice bacon
1 handful cherry or sungold tomatoes (8-10)
The Process:
Add the bacon to a cold cast iron skillet and set over medium low heat. Fry, turning frequently, until fat has rendered and bacon is crisp. Remove bacon to a paper towel lined plate to drain. Crumble and reserve.
Increase heat to medium-high. Add the tomatoes to the bacon fat in the skillet and sautee until the skins blister and begin to burst, turning occasionally, 4-5 minutes.
Remove blistered tomatoes to a serving bowl. Drizzle pan juices over top. Sprinkle with reserved bacon. Serve warm.
Seize the food! A new year's resolution to experiment with 100 new recipes in the coming year.
Showing posts with label bacon. Show all posts
Tuesday, October 7, 2014
Sunday, October 5, 2014
Corn Chowder with Pablanos and Zucchini
Are you tired of corn yet? I know I am. Oy vey! This is the last corny recipe for a while. I promise!
Well, at least until the salsas and pickled corn get prepped for our winter stash.
adapted from Vodka and Biscuits
serves 4
The Ingredients:
3 slices of bacon
1 onion, diced
2 cloves of garlic, minced
1 poblano pepper, stem and seeds removed, finely diced
2 medium zucchini or yellow squash, diced
1 Tbsp butter
3 ears of corn, shucked and kernels removed
2 cups milk
3-4 green onions, sliced, divided
salt and pepper to taste
The Process:
Heat a large, heavy-bottom saucepan over medium-high heat. Add the bacon and cook until the fat is rendered and the bacon crisp. Remove and reserve the bacon for garnish.
Add the onion, pablano and garlic to saucepan with the bacon fat. Sauté until the vegetables are tender and fragrant, 3-4 minutes.
Add the butter and squash and toss to coat. Reduce heat to medium and cover saucepan with a lid. Cook the vegetables an additional 5 minutes or until the squash is tender.
While the vegetables cook, combine the milk with half of the corn kernels in a blender. Blend on high until very smooth.
Transfer the corn purée into the saucepan along with the remaining corn and half of the green onions. Bring soup to a simmer and cook for 5-10 minutes, or until the corn is heated through and the soup has reduced slightly.
Season to taste with salt and pepper.
Serve hot, garnished with reserved bacon and remaining green onion.
Friday, July 25, 2014
Roasted Potato Salad with Fennel Bacon Dressing
I adore my CSA. I truly do. But at times it can be difficult to keep up with the bounty of produce...particularly the items that are not in my usual repertoire.
Fennel, for example.
I love the slight anise taste of fennel. Shaved in salads, roasted with beets, sautéed and drizzled with vinaigrette, adding a touch of crunch to tuna or chicken salads. But I'm sitting four bulbs right now.
Time to sneak some into a twist on German-style potato salad. Key ingredients? Potatoes. Bacon. Vinegar.
Done, done and done.
The fennel was a surprisingly nice touch, adding a slight herbal not that no one could quite put their finger on...
the recipe is my own
serves 6-8
The Ingredients
2 1/2 lbs purple and/or yellow potatoes
kosher salt
1/2 cups cider vinegar
1 1/2 tsp toasted fennel seeds
1 bulb of fennel, diced
6 strips of bacon
1 tsp honey
2 tsp dijon mustard
2 Tbsp extra virgin olive oil
1/2 cup fennel fronds, chopped
2 green onions, thinly sliced
The Process
Preheat the oven to 425 degrees F.
Scrub the potatoes and pat dry. Cut into 1-inch chunks. Lightly oil a baking sheet and arrange the potatoes in a single layer. Generously sprinkle with salt. Roast for 30 to 35 minutes, flipping once, or until potatoes are tender and lightly browned.
In a glass bowl or measuring cup, combine the vinegar and fennel seeds. Allow to rest for 5-10 minutes for the fennel flavor to permeate the vinegar.
Meanwhile, heat a large cast iron skillet over medium-high heat. Add the bacon and cook until crisp. Remove bacon to a paper towel lined plate to drain. Add the diced fennel to the bacon fat in the skillet and sautée for 3-4 minutes, or until fragrant tender. Carefully add the vinegar with fennel seeds and cook for 2 minutes more. Whisk in the honey, mustard, and oil.
In a large bowl combine the hot fennel dressing with the roasted potatoes and toss gently to coat. Fold in the green onions and fennel fronds. Coarsely chop the reserved bacon and gently toss to distribute. Season with salt and pepper, to taste.
Serve warm
Friday, July 18, 2014
Wilted Greens with Runny Eggs
To me, this is an ideal breakfast. Warm and filling. Ready in about 20 minutes. Perfectly portioned to share for a light morning nosh. Or generous enough single single serving for a more ravenous appetite.
Any greens will work: kale, collard greens, mustard greens, spinach. I opted for turnip greens. Nix the bacon to make the dish vegetarian. Or toss on some hot sauce for an extra punch. I love how easy this types of dishes adapt to many tastes!
the recipe is my own
serves 1-2
The Ingredients:
2 strips of bacon
2 green onions, thinly sliced
1 clove of garlic, minced
1 bunch of greens, 4-5 oz
2 eggs
salt and pepper
The Process:
Preheat the oven to 350 degrees F.
In a 9 inch cast iron skillet set over medium-high heat, fry the bacon until crisp and most of the fat has rendered, about 4-5 minutes. Transfer to a plate lined with paper towels to drain. Coarsely chop and set aside.
Reduce the heat to medium. Add the green onion and garlic to the bacon fat in the skillet. Sauté until fragrant, 1-2 minutes. Add the greens and saute until they just begin to wilt, another 2-3 minutes. Season with salt and pepper. Remove from heat.
Using the back of spoon, create two divots in the greens. Carefully break 1 egg into each divot, taking care to keep yolks intact. Bake until egg whites are set, 5-6 minutes for runny yolks, 8-10 minutes for hard set. Sprinkle with bacon and serve immediately, the eggs will continue to cook from the residual heat in the skillet.
Labels:
30 minute meal,
bacon,
breakfast,
CSA,
eggs,
garlic,
greens,
south beach phase 2
Tuesday, May 27, 2014
Chocolate Cupcakes with Bourbon Cream Cheese Frosting and Candied Bacon
I made these beauties a while back, during a fit of madness in the kitchen. Unfortunately the madness hit the same time I was in the midst of a long lapse in blogging. But the recipe lives on!
the recipe is my own
yields 16-20 cupcakes and a lot of extra frosting
The Ingredients
Bourbon Chocolate Cupcakes:
1/2 c cocoa powder
1 cup boiling water
1 1/3 cup flour
2 tsp baking powder
1/4 tsp salt
1 stick butter, room temp
1 cup sugar
2 eggs
2 tsp vanilla extract
1 Tbsp bourbon
Bourbon Cream Cheese Frosting:
8 oz cream cheese, room temp
1 stick unsalted butter, room temp
1/8 tsp salt (or use salted butter)
3-3 1/2 cup powder sugar, sifted
1- 2 Tbsp bourbon
1-2 Tbsp milk
Candied bacon:
5 stripes of bacon
2/3 cup brown sugar
The Process
for the cupcakes
Preheat oven to 375 and line 16-20 cupcake tins
Whisk together boiling water and cocoa powder, set aside. Combine flour, salt and baking powder, set aside. Cream together butter and sugar until fluffy. Add the eggs, one at a time until incorporated. Whisk in vanilla and bourbon. Add flour mixture, alternating with chocolate mixture, until just combined. Do not over mix.
Fill cups 1/2 to 2/3 full. I had enough for about 18...they did puff up quite a bit.
Bake 15-20 minutes or until a toothpick inserted in the center comes out clean. Allow to cool completely before frosting.
for the frosting
cream together cream cheese, butter and salt until fluffy. Add sugar, a cup at a time, alternating with 1 Tbsp liquid. I started with 2 Tbsp bourbon and found I did not need the milk to further beat it to a spreadable consistency. 2 Tbsp Bourbon was enough with that amount of powdered sugar.
Spread or pipe onto cupcakes.
for the bacon
preheat oven to 350 and line a baking sheet with foil.
Cut bacon into quarters and press each piece, both sides, into the brown sugar, coating as evenly as possible. Arrange in a single layer on the baking sheet.
Bake 10-20 minutes. This largely depends on the thickness of the bacon. The most recent bacon I used was a Patrick Cudhay which seemed sliced incredibly thin...8 minutes tops. But I've had thick cut bacon take nearly half and hour before. You want to cook the bacon until the sugar has caramelized the bacon is still slightly pliable.
Transfer to a plate or wire rack to cool...it will crisp up more as it cools. Do NOT place the bacon on paper towel to drain. The sugar coating will cause stick.
Allow to cool completely and then use as garnish on the cupcakes.
Enjoy!
Sunday, June 16, 2013
Cheesy Corn Porridge with Garlic-Chives and Bacon
A few months back I made up a batch of pale ale corn muffins, and ever since this recipe has been kicking around in the back of my head. The muffin recipe started out with a polenta-like base. The green chilies, butter and cornmeal smelled so amazing as I stirred up the thick mixture. I briefly contemplated eating the first batch straight from the pot, and mixing up a second one for the muffins.
It took a few weeks, but I started toying around with a few variations until this corn porridge came to be. The dish is equally as wonderfully with a bit of diced jalapeno sauteed up with the bacon, but that heat is a bit too much for me first thing in the morning.
Feel free to play around. One stalk of green onion and a clove of garlic is a great fragrant base, but with the arrive of our first CSA box, I had to give the garlic chives a whirl
the recipe is my own
serves 1
The Ingredients:
2 slices of bacon, cut into 1-inch pieces
2-3 Tbsp chopped garlic chives
1/3 cup coarsely ground cornmeal
1 cup water
1/4 cup shredded cheese (pepper jack, colby, cheddar blend)
The Process:
Heat a medium saucepan over medium high heat. Add the bacon and saute until the bacon is crisp and most of the fat is rendered. Remove the bacon to a paper towel lined plate to drain. Add the chives and stir until fragrant, about 1 minute. Stir in the cornmeal to coat in the bacon grease.
Add a small amount of the water, scraping up any brown bits from the bottom of the pan. Add the remaining water, bring the mixture to a boil. Promptly reduce heat and simmer until the cornmeal is thick and creamy, about 20 minutes. Remove from heat, stir in the cheese and reserved bacon. Season with salt and pepper to taste and enjoy.
It took a few weeks, but I started toying around with a few variations until this corn porridge came to be. The dish is equally as wonderfully with a bit of diced jalapeno sauteed up with the bacon, but that heat is a bit too much for me first thing in the morning.
Feel free to play around. One stalk of green onion and a clove of garlic is a great fragrant base, but with the arrive of our first CSA box, I had to give the garlic chives a whirl
the recipe is my own
serves 1
The Ingredients:
2 slices of bacon, cut into 1-inch pieces
2-3 Tbsp chopped garlic chives
1/3 cup coarsely ground cornmeal
1 cup water
1/4 cup shredded cheese (pepper jack, colby, cheddar blend)
The Process:
Heat a medium saucepan over medium high heat. Add the bacon and saute until the bacon is crisp and most of the fat is rendered. Remove the bacon to a paper towel lined plate to drain. Add the chives and stir until fragrant, about 1 minute. Stir in the cornmeal to coat in the bacon grease.
Add a small amount of the water, scraping up any brown bits from the bottom of the pan. Add the remaining water, bring the mixture to a boil. Promptly reduce heat and simmer until the cornmeal is thick and creamy, about 20 minutes. Remove from heat, stir in the cheese and reserved bacon. Season with salt and pepper to taste and enjoy.
Monday, May 13, 2013
Bacon Wrapped Trout with Chives, Tarragon and Dill
The presentation of a whole broiled fish is quite an impressive sight. Perhaps a little intimidating for some. Wrapped in bacon and you may even forget that dinner is staring at you with mouth a gap in a silent scream. But, oh is this fish so good...
The cavity of fresh, cleaned trout is the perfect way to infuse the fish with flavor from the inside. The bacon neatly holds everything together, while basting the fish with its salty fat. I tried a similarly ingenious thai twist on trout a while back, and had promised I wouldn't shy away from preparing whole fish in the future. I am looking forward to a plethora of other fresh herb combinations...and perhaps someday in the warm summer months ahead...a camp fire or grill.
Enjoy!
adapted from recipes at Bon Appetit and Epicurious
serves 2
The Ingredients:
2 whole trout 10-12 oz each, cleaned
1 Tbsp salt
1/4 tsp cracked pepper
1/4 tsp red pepper flakes
1/4 tsp garlic powder
1/4 tsp smoked paprika
2 small sprigs of fresh dill
1 small sprig of fresh tarragon
1 small bundle of chives
4 slices of lemon, about 1/8-inch thick
4-6 slices of bacon
The Process:
Preheat the broiler.
Line a broiler pan or shallow baking dish with foil.
In a small bowl, mix together the salt, cracked pepper, red pepper flakes, paprika and garlic powder.
Generously sprinkle the inside of the trout with the seasoning blend. Layer two lemon slices, one spring of dill, half of the tarragon and half of the chives in the cavity.
Repeat with the other trout. Wrap each trout with 2-3 slices of bacon.
Place the fish on the foil lined pan and broil, about 4 inches from the heat, for 7-9 minutes per side. The bacon and skin of the fish should be crispy and blistered, and the flesh of the fish should flake eaily.
Garnish with lemon and chopped chives.
Thursday, April 25, 2013
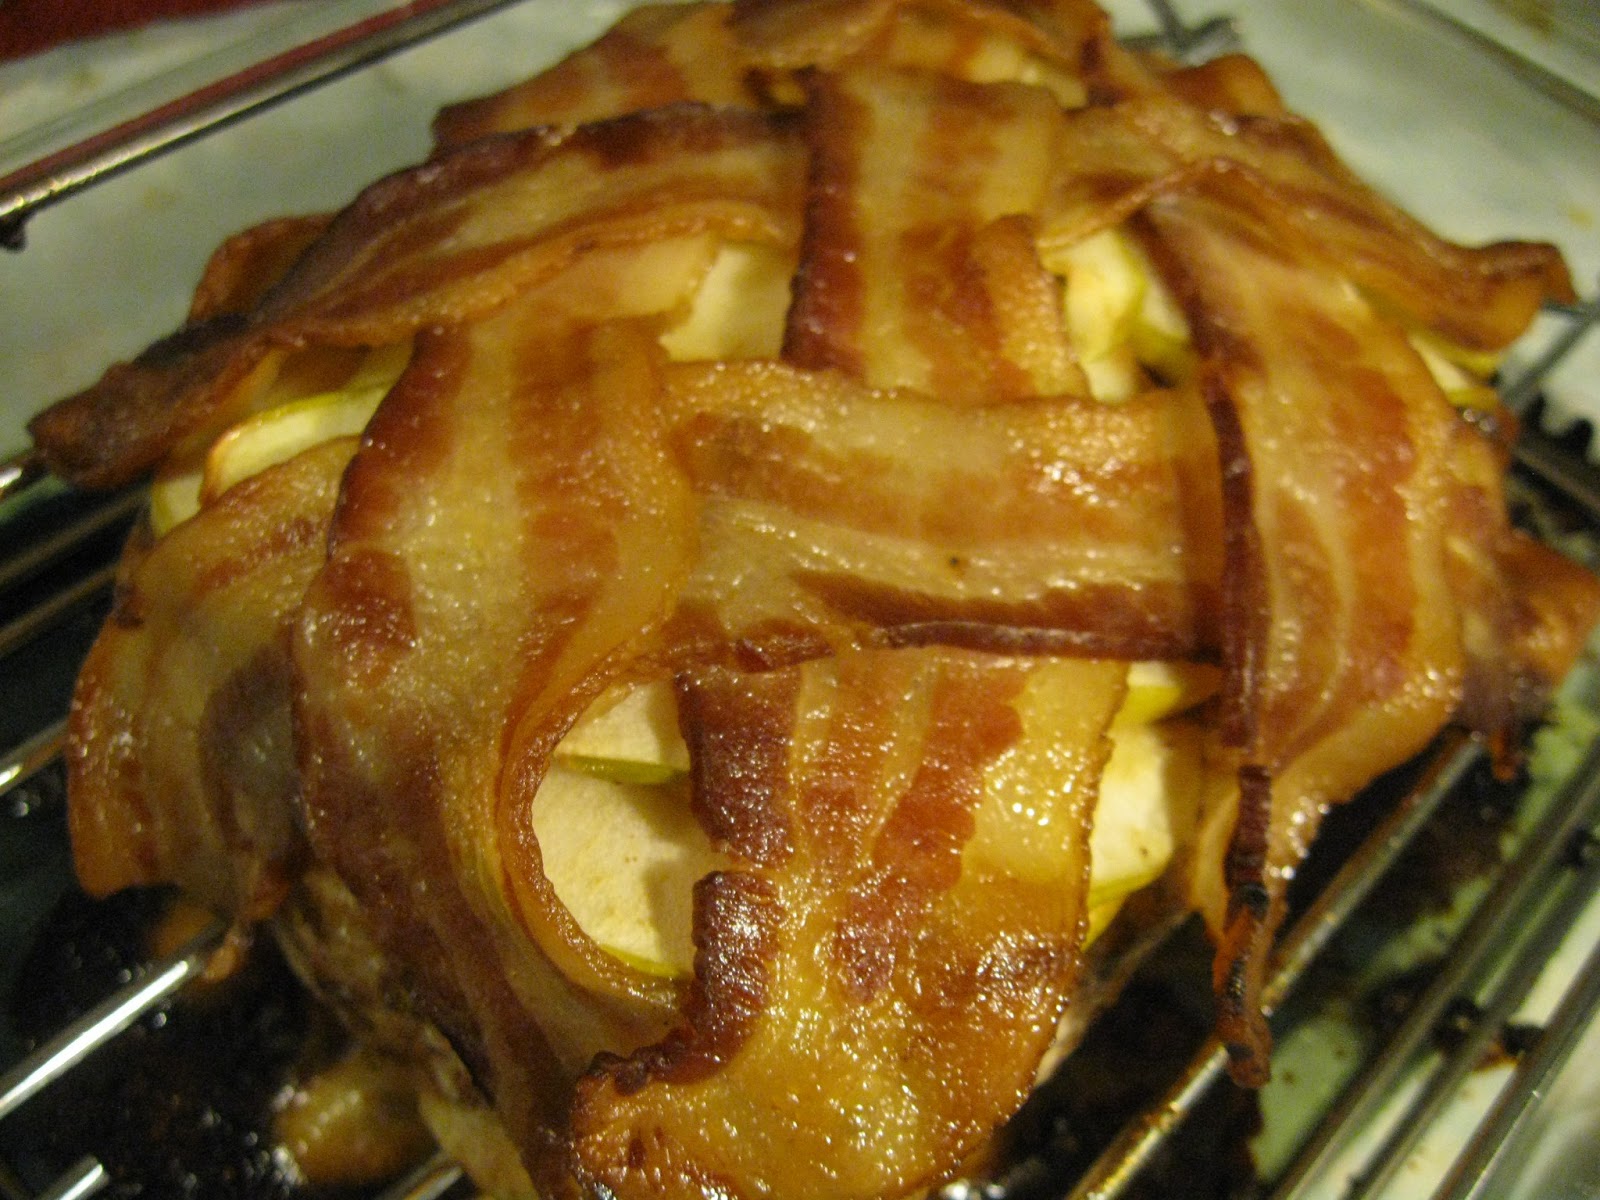
Maple Apple Bacon Pork roast
Sweet, salty, smokey and just a little bit of spice...this may be one of the best pork roasts I've concocted to date!
The recipe is my own
The Ingredients:
2-6 lb boneless pork roast, preferably a rib end roast
1 Tbsp of your favorite spice rub per lb
1 Tbsp brown sugar per lb
1 Tbsp maple syrup per lb
1 granny smith apple, thinly sliced
6-8 sliced hickory smoked bacon
The Process:
Preheat the oven to 325
In a small bowl combine 1 Tbsp each of the spice rub, brown sugar and maple syrup for every pound of roast. Mash into a thick paste and spread over the entire roast. Place the apple slices on top of the coated roast in slightly overlapping layers.
Lay the bacon diagonally over the top, weaving into a lattice.
Place the roast in a roasting pan and cook, uncovered, for about 25-30 minutes per pound or until the interior temperature reaches 145 (160 for well done), and the bacon has begun to crisp. Remove from the oven and loosely tent with foil. Allow to rest at least 10 minutes before slicing.
The recipe is my own
The Ingredients:
2-6 lb boneless pork roast, preferably a rib end roast
1 Tbsp of your favorite spice rub per lb
1 Tbsp brown sugar per lb
1 Tbsp maple syrup per lb
1 granny smith apple, thinly sliced
6-8 sliced hickory smoked bacon
The Process:
Preheat the oven to 325
In a small bowl combine 1 Tbsp each of the spice rub, brown sugar and maple syrup for every pound of roast. Mash into a thick paste and spread over the entire roast. Place the apple slices on top of the coated roast in slightly overlapping layers.
Lay the bacon diagonally over the top, weaving into a lattice.
Place the roast in a roasting pan and cook, uncovered, for about 25-30 minutes per pound or until the interior temperature reaches 145 (160 for well done), and the bacon has begun to crisp. Remove from the oven and loosely tent with foil. Allow to rest at least 10 minutes before slicing.
Friday, February 15, 2013
Slow Cooker Juniper Chicken
Snowy, snowy days call for hot and hearty meals. A day like today last Sunday necessitates making the most out of what is already in the pantry, because there would be no "quick" drive to the grocery store for any last minute items. Thankfully, we had all of these items on hand. Including the juniper berries.
Remind me to pick up more before the first of March...I'll need them to brine our corned beef..
adapted from The Biggest Book of Slow Cooker Recipes
serves 4
The Ingredients:
2-3 slices of bacon
3-4 carrots, cut into 1/2 inch pieces
2 stalks celery, cut into 1/2 inch pieces
1 small onion, cut into quarters
4 large chicken thighs, skinned
1/4 cup dry red wine
1/2 cup chicken broth
2 Tbsp instant tapioca
1 sprig fresh rosemary
1 sprig fresh thyme
2 tsp juniper berries
salt and pepper to taste
1 cup frozen peas
2 Tbsp currant jelly
The Process:
Cook the bacon in a large skillet until crisp. Drain, crumble and set aside.
Layer the carrots, celery and onions along the bottom of a 3 1/2 to 5 qt crock pot. Place the chicken pieces on top. Sprinkle bacon, rosemary, thyme, juniper berries, salt and pepper over the chicken. In a small bowl, whisk together the wine, broth and tapioca. Pour over the chicken. Cook on low for 6-7 hours or on high for 3 to 3 1/2 hours.
Using a slotted spoon, transfer the chicken and veggies to a serving platter and keep warm. Add the peas to the crock pot and cook for 5 minutes, or until heated through. Whisk the jelly into the juices until smooth. Spoon the resulting sauce over the chicken.
Remind me to pick up more before the first of March...I'll need them to brine our corned beef..
adapted from The Biggest Book of Slow Cooker Recipes
serves 4
The Ingredients:
2-3 slices of bacon
3-4 carrots, cut into 1/2 inch pieces
2 stalks celery, cut into 1/2 inch pieces
1 small onion, cut into quarters
4 large chicken thighs, skinned
1/4 cup dry red wine
1/2 cup chicken broth
2 Tbsp instant tapioca
1 sprig fresh rosemary
1 sprig fresh thyme
2 tsp juniper berries
salt and pepper to taste
1 cup frozen peas
2 Tbsp currant jelly
The Process:
Cook the bacon in a large skillet until crisp. Drain, crumble and set aside.
Layer the carrots, celery and onions along the bottom of a 3 1/2 to 5 qt crock pot. Place the chicken pieces on top. Sprinkle bacon, rosemary, thyme, juniper berries, salt and pepper over the chicken. In a small bowl, whisk together the wine, broth and tapioca. Pour over the chicken. Cook on low for 6-7 hours or on high for 3 to 3 1/2 hours.
Using a slotted spoon, transfer the chicken and veggies to a serving platter and keep warm. Add the peas to the crock pot and cook for 5 minutes, or until heated through. Whisk the jelly into the juices until smooth. Spoon the resulting sauce over the chicken.
Tuesday, November 6, 2012
One Pot Bacon Mac and Cheese
Mac and Cheese is comfort food, pure and simple. Gooey, creamy and loaded with carbs. I don't often make this cheesy bowl of guilt at home...but it is a rare treat when Ross and I go out to eat. You can learn a lot about a place based on how they prepare and present a simple bowl of noodles and cheese sauce.
The perfect mac and cheese is a highly debated topic. One I typically avoid. Favorite variations run the gamut from classic blue box, thick and creamy breadcrumb topped baked casseroles, straight forward one-cheese-wonders, and complex combinations of exotic dairy. Some like shells. Others swear by elbows. Occasionally a rotini fan jumps in. And the add ins...or they are endless. Bacon, chilies, tuna, tomatoes, broccoli, peas, chicken...really, it's whatever strikes your fancy. One of the most unique combinations I've had was at a restaurant in Madison...smokey with a spicy kick...piled over a generous mound of savory pulled pork and baked with a crumb crust....Ross is bound and determined to replicate the recipe one day.
This mac and cheese is not that mac and cheese.
What I do love about this particular dish is its simplicity. No boiling and straining the pasta. No béchamel sauce. One pot. Simple ratios to remember...equal parts milk and pasta. Half as much cheese. Mustard powder, salt and pepper to taste. And add in extras to your hearts content.
A few things I've learned making this...rontini pasta works fine, as do elbows, but I adored the way the shells cooked up the best. Your preference may vary. But stick with regular pasta...not whole wheat, not protein-enriched or extra-fiber or whatever other clever marketing gimmick is out there to sell 'healthy' pasta right now. This dish is all carbs and fat. Embrace it. The other pastas will not cook up as tender or plump.
Any combinations of cheeses will work. I love to mix it up with at least three. Cheddar, jack and gouda are sort of my stand by. Cheddar/Romano/asiago is grand. Cheddar/fontina/Gruyere yields and extra creamy sauce. Pepper jack, Parmesan, blue cheese, Gorgonzola or anything aged or smoked will lend a wonderful depth and a bit of bite. Of course, the whatever-is-in-the-fridge method works wonderfully too!
One cheesy caveat, though...do not use pre-packaged shredded cheese. These contain additives to keep the cheese from clumping and will create a grainy texture in your otherwise wonderful dish. Hand grated is much, much better...
adapted from the White on Rice Couple
serves 3-4 (but only if you know how to share)
The Ingredients:
4 strips of bacon, cooked and crumbled
2 cups elbow or shell pasta
2 cups milk (whole yields the creamiest result, skim will work)
1 cup shredded cheese (cheddar, jack, fontina, Gruyere, Romano, Parmesan,Gouda, etc, etc)
1 Tbsp butter
1/2 tsp salt
1/4 tsp mustard powder
pepper to taste
cayenne pepper to taste.
The Process:
In medium saucepan, stir together the milk, pasta butter, mustard powder and salt.
Bring to a gentle simmer over medium low heat, stirring constantly. Stir, stir, stir! Allow to simmer until most of the milk has been absorbed and the pasta is tender, about 20 minutes. Add additional milk in 1/4 cup increments as necessary if the pasta has not cooked fully.
Season with pepper and cayenne to taste. Sprinkle in the shredded cheese and fold in until the cheese has melted and blended.
Add the bacon. Cover and rest for 5 minutes off of the heat. Stir and thin with additional milk, if desired.
Enjoy!
Sunday, August 5, 2012
Bacon Jam
Yes. You read that right. Bacon. Jam. As in spreadable bacon.
Oh...and there is beer in there mix as well.
yields one pint jar
adapted from The Beeroness
The Ingredients:
Oh...and there is beer in there mix as well.
yields one pint jar
adapted from The Beeroness
The Ingredients:
12 oz bacon (8-10 strips)
4 cloves of garlic, minced
1/2 cup onion
8 oz amber ale
1/4 cup apple cider vinegar
3/4 cup brown sugar
In a large saucepan or dutch oven, fry the
bacon until crispy. Work in batches as necessary. Alternatively, you can bake or microwave the bacon to the desired level of crispness. Remove the bacon from the pan
and blot off any excess drippings. Allow to cool and then roughly chop. Reserve about 1 Tbsp of the bacon drippings and discard the rest.
Add the dripping to the pot along with the onions. Cook the onions over medium-high heat until the onions become translucent and tender, about 3
minutes. Add the garlic and stir for about 30 seconds. Slowly add the amber
ale and vinegar, scraping the bottom of the pot to deglaze. Add the
brown sugar and the bacon. Reduce the heat to simmer a simmer and cover, keeping the lid slightly tilted or offset to allow steam to escape. Stir occasionally and cook until the mixture is
reduced to a thick and syrupy consistency, about
45-60 minutes. Transfer to a food processor and pulse until a coarse paste is formed.
Serve at room temperature.
Will keep in the refrigerator for about two weeks...if it lasts that long...
The Review:
There will be skeptics. Let them be suspicious. It will leave far more of the salty, meaty, slightly sweet and boozy wonderfulness all for you...
We tried it on burgers. We tried it on biscuits. We refrained from eating it by the spoonful.
Labels:
bacon,
beer,
jams jellies and preserves,
pork,
sugar
Thursday, July 26, 2012
Balsamic Bacon Broccoli
Have broccoli in your fridge? Tired of steamed, bland side dishes? Then get that bright green veggie out of your fridge, now. Seriously. If this doesn't appease the veggie averse, or spice up the typical veggie blahs, I'm not quite sure what else will work...
the recipe is my own
serves 2-3
The Ingredients:
4 strips of bacon
2 cloves of garlic, minced
1 small yellow onion, diced
2 broccoli crowns, cut into florets
1 broccoli stem, cut into coins
2 Tbsp balsamic vinegar
1/4 cup water
1/2 tsp red pepper flakes
salt and pepper to taste
The Process:
In a large skillet over medium-high heat, fry up the bacon unto crispy. Remove the bacon to paper towels to drain, reserving the dripping in the pan.
Add the garlic and onions; saute until fragrant and tender, 2-3 minutes. Add the broccoli, vinegar, water and red pepper flakes. Cover and steam until the broccoli is tender and vibrant green, adding more water as necessary.
Chop up the bacon and add it to the skillet. Season with salt and pepper to taste. Serve hot.
The Review:
Fast, easy, bacon-y and full of veggies. Yum.
Sunday, April 22, 2012
Bacon Wrapped Asparagus
I came to the conclusion long ago that most vegetables are vastly improved by roasting at extremely high temperatures. Allowing them to them and crisp, only a touch of salt and drizzle of oil added to help them on their way.
But then again, I was always one to eat my veggies.
Some people need a little more coaxing. When roasting isn't enough, bacon usually does the trick.
We're in luck right now. Asparagus is coming into season. Not the thick woody stalks the occasionally show up the rest of the year. I'm talking about the thin delicate green spears lined up like attentive soldiers. It only takes one bad experience to turn some on off of these wonderful vegetables. For me it was the chewy fibrous stalks that turned me off, interspersed with the occasional serving of mushy canned asparagus. Why, why, why! Serving such a wonderfully tender vegetable in such an abysmal state turns off many a child.
This preparation may be the key to winning their hearts back.
Did I mention the bacon? I never claimed this side dish was completely guilt free...
adapted form Jessica's recipe at How Sweet It Is
yields 4 bundles
The Ingredients:
1 bunch of asparagus, the thinner the better
4 slices bacon
1 1/2 Tbsp olive oil
2 tsp sesame oil
1 1/2 Tbsp brown sugar
1to 2 garlic cloves, minced
1/2 Tbsp toasted sesame seeds (optional)
The Process:
Preheat oven to 400.
Line a baking sheet with aluminum foil and place a wire rack on top. Spray the rack with nonstick spray. (I use this method to broil meat a lot too...work wonderfully in lieu of a broiler pan!)
In a small bowl, whisk together oils, brown sugar and garlic. Set aside.
The Review:
I've wrapped asparagus in bacon before, but this was the first time I roasted the bundles or added a glaze. Both push the dish to the next level. Usually I would pan fry the bundles, butt hey you are left with the puddles of bacon fat that start to practically deep fry the asparagus. Don't get me wrong...that in and of itself is pretty amazing. But by roasting the bundles on a rack, the fat can drip off, creating a crispier bacon, more tender asparagus and that wonderful caramelization from the glaze.
Oh that glaze. Bacon and brown sugar go hand in hand in our household. That slight bit of sweet. Oh my word...
A few weeks later we tried bacon wrapped bundles again, this time sans the glaze. The smokey flavor from the grilled added yet another amazing dimension to the dish, but after having that hint of brown sugar on the last batch...it was much missed the second time around...
But then again, I was always one to eat my veggies.
Some people need a little more coaxing. When roasting isn't enough, bacon usually does the trick.
We're in luck right now. Asparagus is coming into season. Not the thick woody stalks the occasionally show up the rest of the year. I'm talking about the thin delicate green spears lined up like attentive soldiers. It only takes one bad experience to turn some on off of these wonderful vegetables. For me it was the chewy fibrous stalks that turned me off, interspersed with the occasional serving of mushy canned asparagus. Why, why, why! Serving such a wonderfully tender vegetable in such an abysmal state turns off many a child.
This preparation may be the key to winning their hearts back.
Did I mention the bacon? I never claimed this side dish was completely guilt free...
adapted form Jessica's recipe at How Sweet It Is
yields 4 bundles
The Ingredients:
1 bunch of asparagus, the thinner the better
4 slices bacon
1 1/2 Tbsp olive oil
2 tsp sesame oil
1 1/2 Tbsp brown sugar
1to 2 garlic cloves, minced
1/2 Tbsp toasted sesame seeds (optional)
Preheat oven to 400.
Line a baking sheet with aluminum foil and place a wire rack on top. Spray the rack with nonstick spray. (I use this method to broil meat a lot too...work wonderfully in lieu of a broiler pan!)
In a small bowl, whisk together oils, brown sugar and garlic. Set aside.
Snap off the woody asparagus ends by holding one spear firmly and bending it until it breaks, it should break at the point where the stem becomes tough. Discard the tough ends. Divide the asparagus into 4 even bundles tightly wrap a piece of bacon
around the bundle. Place on the wire rack seam-side down and repeat.
Using a pastry brush, generously brush
the spears with the oil/sugar mixture. Sprinkle with sesame seeds.
Roast for 35-40 minutes, or until bacon
is crispy and the tips are slightly charred. The bundles may also be grilled over hot coals. Serve warm.
The Review:
I've wrapped asparagus in bacon before, but this was the first time I roasted the bundles or added a glaze. Both push the dish to the next level. Usually I would pan fry the bundles, butt hey you are left with the puddles of bacon fat that start to practically deep fry the asparagus. Don't get me wrong...that in and of itself is pretty amazing. But by roasting the bundles on a rack, the fat can drip off, creating a crispier bacon, more tender asparagus and that wonderful caramelization from the glaze.
Oh that glaze. Bacon and brown sugar go hand in hand in our household. That slight bit of sweet. Oh my word...
A few weeks later we tried bacon wrapped bundles again, this time sans the glaze. The smokey flavor from the grilled added yet another amazing dimension to the dish, but after having that hint of brown sugar on the last batch...it was much missed the second time around...
Wednesday, March 21, 2012
Mini Caramelized Onion Quiches with Sriracha Glazed Bacon
Have you noticed how many recipes for mini quiches are out there? And yet so few of them utilize a crust. I completely sympathize. The pastry is fussy and time consuming when you're trying to work small. One of my least favorite tasks in the kitchen is rolling out uniformly thin layers of pastry crust or cookie dough. But in this instance, the butter crust adds a lot to the texture and flavor of the quiche. And the crimped and pleated edges of pastry practically blossom out of the muffin tins. They are quite stunning.
Many tarts, galettes, pastries and quiches have been featuring caramelized onions as of late. So I have decided to jump on the bandwagon. Added bonus...mini quiches means I'll breakfast ready to heat on eat for the next few days.
the recipe is my own
yields 12 mini quiches
The Ingredients:
for the bacon
3 slices thick cut bacon
1 Tbsp honey
1-2 tsp Sriracha
for the onions
2-3 medium onions, peeled and thinly sliced
1 Tbsp olive oil
1 Tbsp butter
1/4 tsp salt
for the quiche
pie crust or pate brisse for a dbl crust
4 eggs
1/2 cup +2 Tbsp heavy cream
1/2 cup + 2 Tbsp milk
1/2 tsp salt
1/4 tsp pepper
1/4 tsp thyme
pinch cinnamon
3/4 cup cheese of your choice, shredded
The Process:
for the bacon:
Preheat the oven to 450. On an aluminum lined baking sheet, lay the bacon out in a single layer. In a small cup or bowl, stir together the honey and sriracha. Brush the glaze evenly over each slice of bacon.
Bake for 10-15 minutes or until the bacon reaches the desired level of crispness. Remove the bacon to paper towels to drain and cool.
for the onions:
In a large skillet over high heat, melt the butter and heat the oil. Add the onions in a single layer over the entire bottom of the skillet. Reduce the heat to medium, medium-low. Saute the onions over low heat, stirring every 2-3 minutes. After 5-7 minutes sprinkle with salt to extract more of the liquid from the onions. Continue to saute over medium-low heat, stirring only every 2-3 minutes. The onions should slowly begin to brown and caramelize.

After the desired caramelization is achieved, about 20-30 minutes, remove from heat and set aside.
for the quiche:
Preheat the oven to 375 and lightly oil a 12 cup, standard-sized muffin tin.
Roll out the pastry crust or pate brisse. Cut out twelve 5- inch circles and gently press one circle into each cup of the tin, gently pleating and folding the edges as needed.
In a medium bowl whisk together the eggs, cream, milk and seasonings. Set the egg mixture aside.
Divide the caramelized onions between the 12 pastry cups, using roughly 1 tsp per quiche. Top each with 1/4 strip of bacon, snipped into small pieces. Sprinkle with 2-3 tsp of shredded cheese. Pour about 3 Tbsp of the egg mixture into each cup, filling within 1/4 inch of the crust's lip.
Bake for 30 to 35 minutes until the quiche puffs up and begins to brown. A toothpick inserted into the middle should come out clean. Allow the mini quiches to cool in the tin for 5-10 minutes, enabling the egg mixture to set up. Gently remove the mini quiches from the muffin tin to a cooling rack. Let rest until the egg settles and levels out and the quiches are cool enough to handle.
Serve warm.
The Review:
Fresh out of the oven, domed golden treasures peeked out from their pastry petals. They quickly settled, but with that first glimpse I knew I was in for a treat.
I had a hard time waiting for the mini quiche to cool enough to take a bite. But that first bite...heavenly. The crust broke away in a flaky, buttery burst to reveal the smooth, velvety egg within. A salty, smokey pop of bacon followed, and close behind that...the slight sweetness and almost creamy layer of caramelized onion. A subtle warmth danced across my tongue as the Sriracha came forward to finish off the bite. One small bite...so many flavors and textures.
While still warm, the egg and bacon flavors dominated these lovely little breakfast bites. As with many things, the flavor improved with time. The next day the Sriracha created the most wonderful subtle warmth without a trace of vinegar or bite. The onions held their own more strongly against the smokey burst of bacon. And all in all the flavors mellowed and mingled a little more harmoniously.
Of course, saving them for next morning's breakfast sacrifices that gloriously flaky crust, unless you have time to reheat them in the oven. Convenience always has its price.
Ross didn't care much for the Sriracha. But the fillings for these quiche are limitless. Even a change as simple as a maple-peppercorn or honey-whiskey glaze on the bacon would be enough to launch these breakfast gems into completely different flavor-filled waters.
Many tarts, galettes, pastries and quiches have been featuring caramelized onions as of late. So I have decided to jump on the bandwagon. Added bonus...mini quiches means I'll breakfast ready to heat on eat for the next few days.
the recipe is my own
yields 12 mini quiches
The Ingredients:
for the bacon
3 slices thick cut bacon
1 Tbsp honey
1-2 tsp Sriracha
for the onions
2-3 medium onions, peeled and thinly sliced
1 Tbsp olive oil
1 Tbsp butter
1/4 tsp salt
for the quiche
pie crust or pate brisse for a dbl crust
4 eggs
1/2 cup +2 Tbsp heavy cream
1/2 cup + 2 Tbsp milk
1/2 tsp salt
1/4 tsp pepper
1/4 tsp thyme
pinch cinnamon
3/4 cup cheese of your choice, shredded
The Process:
for the bacon:
Preheat the oven to 450. On an aluminum lined baking sheet, lay the bacon out in a single layer. In a small cup or bowl, stir together the honey and sriracha. Brush the glaze evenly over each slice of bacon.
Bake for 10-15 minutes or until the bacon reaches the desired level of crispness. Remove the bacon to paper towels to drain and cool.
for the onions:
In a large skillet over high heat, melt the butter and heat the oil. Add the onions in a single layer over the entire bottom of the skillet. Reduce the heat to medium, medium-low. Saute the onions over low heat, stirring every 2-3 minutes. After 5-7 minutes sprinkle with salt to extract more of the liquid from the onions. Continue to saute over medium-low heat, stirring only every 2-3 minutes. The onions should slowly begin to brown and caramelize.
After the desired caramelization is achieved, about 20-30 minutes, remove from heat and set aside.
for the quiche:
Preheat the oven to 375 and lightly oil a 12 cup, standard-sized muffin tin.
Roll out the pastry crust or pate brisse. Cut out twelve 5- inch circles and gently press one circle into each cup of the tin, gently pleating and folding the edges as needed.
In a medium bowl whisk together the eggs, cream, milk and seasonings. Set the egg mixture aside.
Divide the caramelized onions between the 12 pastry cups, using roughly 1 tsp per quiche. Top each with 1/4 strip of bacon, snipped into small pieces. Sprinkle with 2-3 tsp of shredded cheese. Pour about 3 Tbsp of the egg mixture into each cup, filling within 1/4 inch of the crust's lip.
Bake for 30 to 35 minutes until the quiche puffs up and begins to brown. A toothpick inserted into the middle should come out clean. Allow the mini quiches to cool in the tin for 5-10 minutes, enabling the egg mixture to set up. Gently remove the mini quiches from the muffin tin to a cooling rack. Let rest until the egg settles and levels out and the quiches are cool enough to handle.
Serve warm.
The Review:
Fresh out of the oven, domed golden treasures peeked out from their pastry petals. They quickly settled, but with that first glimpse I knew I was in for a treat.
I had a hard time waiting for the mini quiche to cool enough to take a bite. But that first bite...heavenly. The crust broke away in a flaky, buttery burst to reveal the smooth, velvety egg within. A salty, smokey pop of bacon followed, and close behind that...the slight sweetness and almost creamy layer of caramelized onion. A subtle warmth danced across my tongue as the Sriracha came forward to finish off the bite. One small bite...so many flavors and textures.
While still warm, the egg and bacon flavors dominated these lovely little breakfast bites. As with many things, the flavor improved with time. The next day the Sriracha created the most wonderful subtle warmth without a trace of vinegar or bite. The onions held their own more strongly against the smokey burst of bacon. And all in all the flavors mellowed and mingled a little more harmoniously.
Of course, saving them for next morning's breakfast sacrifices that gloriously flaky crust, unless you have time to reheat them in the oven. Convenience always has its price.
Ross didn't care much for the Sriracha. But the fillings for these quiche are limitless. Even a change as simple as a maple-peppercorn or honey-whiskey glaze on the bacon would be enough to launch these breakfast gems into completely different flavor-filled waters.
Subscribe to:
Posts (Atom)