Showing posts with label oranges. Show all posts

Monday, December 22, 2014

Witbier Cookies


Witness Witbier Cookies paired with Witness Wit, photo by Heather Hanson
photo by Heather Hanson Photography LLC

If witbier were a cookie, this would be it. These are sure to add a bit of citrus-y joy to your holiday! 

The thing that surprised em the most when I tackled this recipe was the beer reduction. I've made reductions with stouts, porters and sours before. Bute never a wheat beer. And never reduced down so far. The resulting syrup was malty and sweet with just a hint of the orange and cardamom used in the beer. I'm tempted to reduce another batch to play around with. Ice cream toppings, a salmon glaze, or perhaps a dash in a cocktail or two?

 Recipe adapted from Food Republic 

Yields about 4 dozen cookies 

Ingredients 
for the cookies
  • 2 – 12 oz bottles of Witbier
  • 5 Tbsp honey
  • ¾ cup unsalted butter (1 ½ sticks), softened
  • 1 ¼ cup powdered sugar
  • 1 egg
  • ½ tsp vanilla extract
  • 2 tsp orange zest
  • 2 tsp ground coriander
  • 2 cups all-purpose flour
  • ½ tsp baking soda
for the glaze
  • ½ tsp vanilla extract
  • 1 Tbsp orange zest
  • 1 Tbsp orange juice
  • 1 Tbsp heavy cream
  • 1 cup powdered sugar
  Preparation
  • Combine the beer and honey in a medium-sized heavy-bottomed saucepan. Over medium heat, bring the beer to a gentle boil, skimming foam as needed. Cook until reduced to 1/3 cup (this may take up to an hour). Allow to cool slightly.
  • Preheat the oven to 350 degrees F. Prepare baking sheets by lining with parchment paper.
  • Cream together the butter and sugar until fluffy and well combine. Beat in the egg and vanilla extract. Add the coriander, orange zest and beer reduction, mixing until just combined.
  • Combine the flour and baking soda. Slowly mix the dry ingredients into the butter mixture.
  • Drop batter by heaping Tbsp onto the prepared baking sheets. Bake for 15-18 minutes, or until golden brown. Transfer to a wire rack to cool.
  • For the icing, whisk together the vanilla, zest, orange juice, cream and powdered sugar. Spoon a dollop onto each cookie and spread icing to the edges. Allow to set 15-20 minutes before serving.
  • ENJOY!

Sunday, November 23, 2014

Spatchcocked Turkey with Cloves and Orange

Photo by Heather Hanson

We should draw our attention to the turkey before the big day arrives. 

I loved this bird more than any other turkey I've ever made. I've taken to brining most turkeys, but the time and room in the fridge can be prohibitive. This bird does need to spend the night before hand in the fridge, but the fear of brine leaking everywhere is no longer a concern. 

This is a smaller turkey, only 10-12 pounds which will still feed a fair number of people. 

The true beauty of this turkey is the cooking time. Spatchcocking...cutting out the spine and spreading it flat, breast side up, cuts down the roasting time to about 90 minutes. The breast remained unbelieveably moist, the dark meat still has time to cook through, and because the bird was flayed open far more of the skin roasted to that perfect crispy golden brown.

So what beer to pair?

Pair with a Belgian Tripel.  Again, as a collaboration with Boom Island, we opted for their Brimsone Tripel. Tripels are a farily common Belgian style. Often corked and caged, these big bottles make quite the presentation at the dinner table. If you can't find Brimstone try Unibroue's La Fin Du Monde, Westmalle's Trappist Tripel, Chimay White or Tripel Karmeliet.

"The centerpiece of Thanksgiving dinner needs an equally impressive beer to join at the table. Brimstone's higher alcohol and effervescent carbonation holds its own against the richness of the turkey, while the hints of clove and honey from the beer help pick up the spices and citrus used in the basting oil."

recipe adapted from Bon Appetit


serves 10-12

Ingredients:
• 4 tsp ground coriander
• ½ cup kosher salt
• ¼ cup finely grated orange zest
• 2 Tbsp brown sugar
• 2 tsp rosemary
• 1 Tbsp thyme
• 2 tsp black pepper
• 1 10–12 lb. turkey
• 2 medium onions, quartered
• 4 large carrots, peeled, halved lengthwise
• 4 celery stalks, halved crosswise
• 2 heads of garlic, halved crosswise
• ½ cup vegetable oil
• 4 wide strips orange zest
• 1 tsp whole cloves
• ½ cup Belgian Pale Ale

Preparation:
• Combine coriander, salt, orange zest, brown sugar, rosemary, thyme, and pepper in a small bowl.
• Place the turkey breast-side down on a cutting board. Using a sharp kitchen shears and some muscle power, cut along both sides of the spine and remove. Flip the turkey breast side up, spreading open as much as possible. Press down on breastbone to flatten. You should hear a crack and feel the bones give way. Rub the entire turkey with salt mixture. Place turkey, skin side up, on a wire rack set inside a rimmed baking sheet. Chill, uncovered, overnight.
• Preheat oven to 450°. Arrange onions, carrots, celery, and garlic in a roasting pan. Rinse turkey, pat dry, and place, skin side up, on top of the vegetables. Let rest at room temperature for 30 minutes.
• Heat oil, orange zest strips and cloves in a small saucepan until oil is sizzling, about 2 minutes. Allow to cool slightly.
• Brush turkey with oil, and add ½ cup of Silvius to the pan. Roast turkey, uncovered, for 30 minutes. Reduce oven temperature to 350° and continue to roast, rushing with oil every 20 minutes, until skin is deep golden brown and crisp and an instant-read thermometer inserted into thickest part of thigh registers 165°, about 1 hour longer. Transfer to a platter; tent

with foil and let rest at least 30 minutes before carving.

Tuesday, April 15, 2014

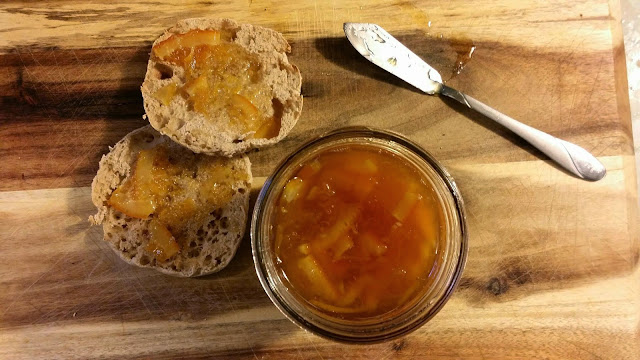
Hefeweizen Marmalade

Stir a little bit of booze into your breakfast! A marmalade has been on my "to create" list for a while now. The arrival of the Beeroness' cookbook finally prompted me to plough ahead. The chance to add beer or bourbon to a recipe is usually all the motivation I need.

Jackie recommends a hefeweizen, preferably one with notes of citrus and clove. A witbier, traditionally brewed with corriander and orange peel, would compliment the marmalade nicely, but I fear the more subtle beer notes would get lost among the sugar and citrus. Serve that one alongside for a lovely food pairing instead. Many pale ales will fit the bill, especially those with strong citrus notes. A saison would add a twist of spice. Steer clear of any uber hoppy beers, as the extensive boiling times may make for a very bitter marmalade.

I opted for Widmer's Hefe

recipe adapted from The Craft Beer Cookbook by Jacqueline Dodd

yields about 2 pints

The Ingredients:
2 - 12 oz bottles hefeweizen
1 lb (about 2) navel oranges
4 1/2 cups granulated sugar
1 Tbsp whole cloves
1/2 lemon, juiced and zest finely grated

The Process:
Thoroughly scrub the oranges. Using a mandolin or a very sharp knife, slice the oranges into 1/8-inch rounds. Remove and discard any seeds as you go. Stack the slices and cut into quarters or sixths.

Wrap the cloves in a cheesecloth bundle tied with kitchen twine.

In a large, heavy-bottomed saucepan, add the beer, oranges, sugar, and clove packet. Bring the mixture up to a simmer (about 190°F). Simmer for 5 minutes. Cover, remove from heat and let stand overnight.

Remove and discard the clove packet. Bring the mixture to a gentle simmer, about 180°F, and maintain for 1 1/2 to 2 hours. The orange rind should be tender and begin to turn transculent. After 2 hours, add the lemon juice and zest. Return the mixture to a gentle simmer, between 185°F and 200°F, for 20-30 minutes.

Place a small plate in the freezer.
Bring the orange mixture to full boil, and stir continually, until it reaches about 222°F.  Test the readiness of the marmalade by placing a teaspoon of the mixture onto the chilled plate and allowing it to sit for 30 seconds. Tilt the plate. The mixture should be a soft gel that moves slightly and will wrinkle when touched. If mixture is thin and runs easily, continue to boil until the marmalade reaches the gel stage.
Ladle into sterile jars, leaving 1/4-inch head-space. Gently stir to remove air bubbles. Wipe rims of jars clean and top with lids, screwing them finger tight (not TOO tight). Submerge filled jars in a water bath of boiling water and boil for 5-7 minutes (process times may vary by elevation).

Remove from water bath and allow to cool undisturbed for 12-24 hours.

Sunday, July 7, 2013

Osso Buco Style Sea Bass with Herb Whipped Potatoes and Orange Gremolata

The seafood adventure continues!  What started out as an attempt to enjoy more seafood at home has since tranformed into an all out culinary challenge.  Each week, Ross picks a day to stop at the fish monger on his way home from work.  Whatever strikes his fancy that day while perusing the tanks and ice trays is destined to become dinner.  He'll text me what he picked up.  And I have the thirty minute or so bus ride home to decide what to do with it...using only what we have at home at the time, cause ain't nobody got time for last minute grocery trips.

All week I was thinking fish and chips.  In all the baked and breaded glory.  Served with lemon garlic aioli.  I couldn't shake that meal from my head.  So what does Ross pick out?  White Sea Bass.  One of the firmest meatiest fillets out there.  Such sacrilige to bread it up and bake it.  This was a fillet that demanded a meaty treatment.  No poaching or en papillote.  No... it wanted to be seared, grilled, broiled, or...braised.

The cooking method eluded me at first after pondering the fish for a while.  But the idea of a gremolata jumped into my head immediately.  Several types of citrus awaited to be used up at home.  But poaching was out of the question.  And the charcoal grill would take to long to get going.  After poking around for gremolata inspiration, I came across a halibut served osso buco style.  The rich, salty tomato and veggie broth sounded like it would stand up to the meaty fillet.  Spike with the bright gremolata?  Sold.  And I still was able to use up a portion of our CSA potatoes in the process.

adapted from Bon Appetit, via Epicurious.

serves 3

The Ingredeints:
for the "Osso Buco"
1 Tbsp olive oil
2 stalks celery, diced
2 medium carrots, diced
1/4 yellow onion, diced
2 cloves garlic, minced
1 Tbsp tomato paste
1/2 cup white wine
2 cups vegetable stock
1/2 tsp salt
1/2 cup crushed tomatoes w/ juices
juice of 1 orange
zest of 1/2 a lemon
2 Tbsp fish sauce
1/2 tsp crushed thyme
1 bay leaf

1 Tbsp olive oil
1 lb white sea bass, skin removed and cut into 3 portions
salt, pepper and cayenne

2 Tbsp balsamic vinegar
1 Tbsp butter

for the whipped potatoes
3/4 lb russet potatoes, peeled and quartered
3 cloves of garlic, halved
2 Tbsp salted butter
2 Tbsp chopped flat leaf parsley
1 Tbsp fresh rosemary, chopped

for the gremolata
2 Tbsp fresh flat leaf parsley
zest of 1 orange
2 cloves of garlic, minced

The Process:
Heat the oil in a large skillet over medium heat.  Add the celery, carrots, onion and garlic.  Saute, stirring frequently, until the veggies are tender and beginning to brown, about 7-10 minutes.  Add the tomato paste and heat through, about 30 seconds.  Add the white wine and simmer until reduced by about half, an additional 5-7 minutes.

Add the broth, crushed tomatoes, orange juice, salt, zest, fish sauce, thyme and bay leaf.  Bring the mixture to a boil, reduce to a simmer and cook until the liquid is reduced by 1/3...about 40 minutes.

Meanwhile, bring a large saucepan of salted water to a boil and add the potatoes and garlic.  Cook until tender, about 25 minutes.

For the gremolata, combine the zest, garlic and parsley.  Mix thoroughly and set aside.

Preheat the oven to 350

In another pan, heat the remaining oil over medium high heat.  Generously season the fillets with salt pepper, and cayenne.  Sear the fillets until browned, about 2 minutes per side.  Remove to a warm plate.  Add the balsamic vinegar to the same pan and simmer for about 1  minute, reducing slightly.  Add the vinegar to the vegetable sauce.  Melt the butter into the sauce.  Remove the bay leaf and transfer the mixture to a 9 x 13 baking dish.  Set the fish on top.  Bake, uncovered for 10 minutes, or until the flesh is opaque and flakes easily. Set aside to finish the potatoes.

Drain the tender potatoes, reserving some of the cooking liquid.  Return to the potatoes to the pot along with butter and whip with an electric beater set to low, or mash by hand.  Add reserved liquid by the Tbsp until the desired consistency is achieved.  Stir in the herbs.

to serve:
Spoon 1/3 of the potatoes onto a dinner plate and spread out slightly.  Top with one of the fillets and spoon the vegetable sauce over top.  Garnish with a generous sprinkle of gremolata.


Tuesday, April 16, 2013

Tangerine-Glazed Ham


Ham is an interesting meat.  Hickory smoke and salt overwhelm the flavors.  A mighty powerful glaze is needed to cut through all of the fat and salt to compliment and play off of the whole.  Sweet pairs well with the smokey.  And citrus manages to cut through the rich smokey flavors to bring a bit of balance.  It's a fine line.  One I truly enjoy playing with round about this time every year.

Sage brings a nice burst of earthy fragrance to the super sweet tangerine glaze.  I adored the carrots sopping up all of the flavor as they simmered below during the last half hour of cooking.   And the tangerine rings are absolutely edible.


Recommended beer pairing: a Belgian Tripel or strong Pale Ale.  The high carbonation will help cut through the richness of the meat, while the citrus-y spice from the yeast will compliment the tangerine. 

adapted from Tyler Florence's recipe

serves 10-12

The Ingredients:
1 - 8 to 10-pound smoked ham, bone-in, skin on  
freshly ground black pepper
1 bunch fresh sage leaves
1/4 cup extra-virgin olive oil
1/2 cup unsalted butter, cut in chunks 
4-6  tangerines
1 cups light brown sugar, packed
1/2 cup water
1/4 teaspoon whole cloves 
1 cinnamon stick
1 1/2 pounds baby carrots

The Process:
Preheat the oven to 300

Place the ham on the rack of a roasting pan, fat side up.  Score into the fat, about 1/4-inch deep, in a diamond pattern.  Sprinkle generously with pepper.

Coarsely chop 8-10 large sage leaves. In a small bowl, or with a mortar and pestle, combine the chopped sage and oil until a thick paste is formed.  Rubbed all over the surface of the ham. 
Bake, on a lower rack in the oven for 1 1/2 - 2 hours.
Meanwhile for the glaze:
Juice 3-4 tangerines, yielding about 1 cup of juice.  Strain out any seeds and pulp.  Thinly slice the remaining tangerines, removing seeds.  In a medium saucepan, combine the juice and fruit with the butter, brown sugar, water and spices.  Bring the mixture to a gentle boil, and reduce to a simmer.  Continue to cook at a simmer for 30-40 minutes or until the mixture has reduced to a thick syrup. 

After 1 1/2 hours of cooking, moving the ham and coat with the tangerine glaze, studding the top with the sliced fruit.  Return to the oven for an additional hour.  Remove and add the carrots around and under the ham.  Toss to coat with the glaze.  Return the ham to the oven and bake an additional 30 minutes, or until carrots are tender.

Allow to rest 10-15 minutes before carving.

Monday, April 1, 2013

Ginger Curried Chicken with Leeks and Lentils


This recipe caught my eye for the combination of curry, leeks and oranges.  I was very excited.  And about halfway through I realized I could have sent the dish a little more through the roof had I vamped on the curry powder instead of relying on the turmeric-heavy store blend.  In the end, the lentils sort dominated the dish.  And the citrus didn't add as much as I had hoped. 

So lesson learned...better curry powder and orange juice instead of wine.

Still, this was a satisfying dish.

adapted from BHG

Serves 2-3

The Ingredients:
1 1/2 pounds meaty chicken pieces
2 Tbsp curry powder
1/2 tsp salt
2 Tbsp olive oil
1 Tbsp fresh ginger, minced 
2 leeks, halved lengthwise
1 tangerine, cut into wedges
1 cup lentils
1 1/2 cup chicken broth
1 cup white wine


The Process
In a gallon zip top bag, toss chicken with salt and 1 Tbsp of the curry powder.  Heat oil in a heavy bottomed pot over medium- high heat. Add the chicken and brown on both sides.  Remove from pot. Add ginger, leeks, tangerine wedges, and remaining curry powder. Saute for 2 to 3 minutes or until leeks are tender and ginger is fragrant.

Stir in lentils, broth, and wine. Return chicken pieces to pan. Bring to a boil. Reduce to a simmer, cover and cook for 55 to 60 minutes or until chicken is tender and no longer pink.

Remove the chicken to a serving platter.  Serve along side lentils.
  

Wednesday, March 20, 2013

Pork Carnitas


Sometimes the mood strikes for something in particular.  I find in those moments, the best course is to heed those moods.  On the first day of spring, when the snow still lingers and temperatures continue to dip, this hearty dish provides hope...

adapted from My Kitchen Escapades

serves 3-4

The Ingredients:
2 pounds boneless pork butt
1 small onion, quartered
1 orange
1 lime
1 cup water
1 bay leaf
1/2 tsp cumin
1/2 tsp oregano
1 tsp salt
1/2 tsp pepper

The Process:
Preheat the oven to 300

Trim the fat off of the pork roast and cut into 2" chunks. Half and juice the orange, reserving the peels.  Juice and zest the lime.  Combine the pork, juices, zest, orange peel, onion, spices and water in a 1-quart Dutch oven.  Bring the mixture to a boil over medium-high heat.  Cover and transfer the Dutch oven to the oven.  Cook until the meat starts to fall about, about 2 hours.

Remove the Dutch oven from the oven,  Spoon the pork into a separate bowl.  Discard the peel and onions, reserving the juices.  Heat the mixture on the stove top to a rolling boil.  Cook the mixture until reduced by about half, about 15 minutes.

Preheat the broiler.

Meanwhile, using two forks, pull the meat apart into bit-sized chunks, but do not shred.  Add the pork into the juices and stir to coat.  Spread the pork and juices in a single layer onto a rimmed baking.  Transfer the pan back into the oven and broil until the meat begins to brown, about 5 minutes.  Using a large spatula, flip the meat, and broil for an additional 3-5 minutes.

Serve hot with tortillas, avocado, onion and cilantro

Monday, March 11, 2013

Orange Chicken with Broccoli


Some nights call for a quick and simple dinner absolutely bursting with flavor.  Okay, perhaps most nights call for this.  While I adore intense, complex and leisurely recipes on occasion, I just do not have the time for them.  This recipe is ridiculously simple to make and easily adaptable to whatever protein or veggies happen to be in your fridge. 

I think this may have become my go-to stir sauce...

adapted from kitchen explorers at pbs.org

serves 4

The Ingredients:
for the sauce
juice and zest of 1 large orange (about 1/2 cup juice)
2 Tbsp soy sauce
2 Tbsp rice vinegar
1 Tbsp oyster sauce
1 Tbsp honey
small knob of ginger, minced
2 cloves of garlic, minced
1/2 tsp crushed red pepper

for the stir fry
1 lb chicken, diced
2 Tbsp corn starch
1-2 Tbsp sesame oil
1 onion, sliced
1 broccoli crown, florets and stem
2-3 carrots, sliced diagonally
1 rib of celery, sliced diagonally

The Process:
In a small bowl whisk together all of the ingredients for the sauce.  Set aside.

Toss the chicken in the corn starch.  Heat the oil in a large skillet or wok over high heat.  Add the chicken and stir fry for 2-3 minutes.  Add the onion and stir fry for 2-3 minutes more, or until the chicken has browned and the onion is just beginning to soften.

Add the vegetables and stir fry for 2-3 minutes.  Add half of the sauce and toss until evenly coated.  Allow to cook a minute or two, until the sauce begins to thicken.  Add the remaining sauce.  Cook until the sauce has thickened and heated through.

Serve with brown rice.


Saturday, March 2, 2013

Hawaiian Rum Punch

Inspired by Hawaii.  I should probably be clear on that...this is certainly no authentic island drink.  Though in the tourist traps and tropical resorts anything served in a coconut or pineapple may qualify.

"One part sour, two parts sweet, three parts strong, four parts weak"

I'm not sure who is originally credited with this saying, though I first heard it from Bobby Flay.  I used this as the basis for our tropical punch.  That and a quick perusal of the drink menu at our very own Tiki bar on the banks of the Mississippi, Psycho Suzi's

Rum and pineapple were key.  I wanted to evoke something akin to POG.  Passion fruit, Orange Guava....not the game.  Though the two are related.

 The rest was trail and error until I discovered something tasty. 

POG, the juice, is exceptionally hard to find in Minnesota.  A lot of pineapple/orange/apple, Pineapple/banana/orange, even passion fruit/orange/apple mixes were on hand when I hunted, but guava remained elusive.  Surprisingly a bushel of the fruit was at our local grocery, but the price and time consuming process of juicing gave me pause.  In the end, flavored rums came to the rescue.  Passion fruit rum I found in a heartbeat.  Guava, again, I could not locate, though supposedly Cruzan makes one.

After tinkering around with different ratios...adding more lime, trying less grenidine, swapping in a few different fruit juices...I ended up pretty much right back with the recipe I based it off of.  The only major difference is I used flavored rums instead of Jamacian white and light rums.  I suppose whrn you have a good thing, it needed be tinkered with.

The end result is a sweet cocktail that is dangerously easy to drink.  The lime cuts through the fruit with just enough tartness.  The grenadine adds a berry like sweetness, but it still lacks that strawberry fragrance that the guava would have lent.  But in the end, I'm very content with the result.

And judging by the empty punch bowl and happy guests, I suspect everyone else was as well.

Recipe inspired by Bobby Flay

yields twelve 6 oz servings

The Ingredients:
1 cup lime juice
1 1/2 cups grenadine
1 cup coconut rum
2 cups Passion fruit Rum
2 cups pineapple juice
2 cups orange juice

Pineapple, cherries and orchids for garnish

The Process:
Combine the juices and rum in a 2 qt pitcher or punch bowl.  Chill at least one hour.

To serve, ladle over ice and garnish with pineapple wedge, cherry and orchid blossom.

Friday, November 30, 2012

Port Cranberry Sauce

As I mentioned in an early post, it's not really Thanksgiving dinner without the cranberry sauce.  The roasted beet cranberry sauce didn't' go over so well with Ross a few weeks back, but this one was a hit.

Perhaps is was the alcohol...

adapted from Food & Wine

yields about 2 cups

The Ingredients:
1/2 cup ruby port
Three 1-by-3-inch strips of orange zest, cut into thin matchsticks
1/2 cup fresh orange juice
3 cups fresh cranberries
3/4 cup sugar 

The Process:
In a medium saucepan over medium heat, bring the port, orange zest and orange juice and bring to a boil. Add the sugar and stir until dissolved.  Stir in the cranberries and reduce heat to low.    Simmer until the cranberries burst and the sauce is jam-like, about 25 minutes. Transfer to a serving bowl and serve warm or at room temperature.  


Tuesday, March 27, 2012

Clementines Confites

A while back I stumbled upon the most riveting story of young love, gluttonous gourmandise, deep longing and a touching hint of guilt. It was the story of one woman's first experience with clementines confites.  The story was a wonderfully bittersweet ode to the syrupy sweet recipe to follow. I have been day dreaming about these perfect orange globes ever since...with only my mind's eye to fuel the obsession, having never tasted them before.  The blog story was my first encounter with the candied fruit.  So finally, just over two weeks ago, the perfect little citrus spheres started their long and sweet journey in my kitchen.

To make my life easier, and because I largely use grams and liters when I'm dying fabric at work, I stuck with metric measures.  The recipe detailed below is for one pound, or approximately 454 grams, of fruit.  Scale the recipe up or down accordingly...keeping the ratios of fruit, sugar, and honey the same.  I found the exact amount of water didn't matter so much as long as there was enough liquid to keep the fruit fully submerged. 

Need a hand with the math?  Shoot me a message...I'll gladly help you out.

Adapted from Lucy's recipe at Lucy's Kitchen Notebook

yields 1 lb/454 grams of candied joy

The Ingredients:
Day One
454 grams clementines
500 grams sugar
200 grams honey
water

Every Other Day Through 2 weeks
an additional 100 grams of sugar*

The Process:
Day One:
Pick the firmest, ripest fruit.  Scrub thoroughly to remove any dirt, waxes or impurities, leaving the skin completely intact.  With a long thin needle or a fine skewer, pierce each fruit deeply all over.  Liberally.  When you believe the fruit as been stabbed enough, pierce it another several dozen times. 

Select a large saucepan that will comfortably fit the fruit in a single layer.  Add the fruit and fill the saucepan with enough water to cover the fruit by 1 inch.  Bring the water to a boil, reduce heat ans simmer for 15-20 minutes.  The fruit should still be firm to the touch.  Using a tongs or slotted spoon, remove the fruit to a large, deep non-reactive (i.e. stainless steel or glass) bowl or jar. 

Add the 500 grams of sugar and 200 grams of honey to the liquid in the saucepan.  Stir to dissolve the sugar and bring the syrup to a rolling boil.   Promptly remove from heat.  Pour the hot syrup over the clementines, weighing them down with a plate if necessary to keep them fully submerged.

Loosely cover the bowl with plastic wrap and let sit undistributed for two days.

Every Other Day:
Remove the clementines from the bowl and transfer the syrup to a saucepan.  Add 100 grams of sugar to the syrup.  Bring to a rolling boil, remove from heat, pour over the clementines loosely cover and let sit for another 2 days.  Repeat this process every 2 days,  adding 100 grams of sugar to the liquid each time for two weeks.  The liquid will thicken and reduce slightly with each addition.  After two weeks has passed, transfer the clementines to a jar cover with their syrup and store in a cool dry place.  They will keep for as long as a year, getting better with age.

*all in all approximately 1200 grams or 2.6 pounds of sugar will be needed per pound of fruit

The Review:
Anticipation can be a blessing and a curse.  Your mouth waters at the thought of biting into a concoction after lovingly tending to it over the course of several days.  Sometimes the anticipation is just enough to whet the appetite, and the final product is beyond the expectations...all of the time and energy spend making each bite all the more rewarding.

Sometimes the anticipation builds and build and builds until it reaches a crescendo that the end result just doesn't life up to.  No amount of justifying or reasoning can bring the dish up to level it failed to reach in your mind.  Each bite becomes bittersweet.  You want so badly to love it, after everything that went into it, but no...expectations had been built up too high...

So where did these sugared citrus fall?  Right in the middle.  The first bite yielded a surprising bit of tart from the peel...not quite the candied peel flavor I was expecting.  The flavor was excellent.  Subtle orange without being overly sweet, despite the vast amount of sugar.  The texture, oh the texture....

This is where the treat failed.  Perhaps is was the variety of clementines.  The market is sadly overrun every year with tiny orange beauties boasting seedless enjoyment, ease of peeling and even sweeter flavors.  As the fruits as thus "perfected" they become genetic shadows of what they had been.  The insides had pulled back from the peel and had almost a dry feel...the pulp and flesh having shriveled slightly allowing the membranes to dominate.  None of the bitterness usually found in the membranes and pith was present, but the texture was a surprising let down.

I do attribute that largely to the fruit.  More time should have been spend on selecting the heaviest, firmest and most fragrant of the bunch.  The batch should have been started almost immediately...the four days on the counter may have allowed them to dry out too much before their sugar bath began.

But where else did this recipe succeed?  In the syrup, hands down.  After filling the jars with enough syrup to cover the fruit I still had nearly a quart of the golden liquid left.  It had a wondrous honey like consistency and a divine, yet subtle citrus flavor.  So far the syrup has paired well stirred into jasmine tea in lieu of honey, drizzled on top of star fruit and kiwi to compliment their tartness and added to oatmeal for a touch of sweetness.

The uses seem endless...the basis for glazes and marinades for meats, in place of simple syrup in cocktails, to top off ice cream, or to lightly sweeten frosting, filling or whipped creams...perhaps just by the spoonful...


I plan on letting the orange gems age a while longer before I exact the next one from the jar.  But in the meantime a little drizzle of the that syrup...

Friday, March 9, 2012

Blood Orange Cake with Honey Whipped Cream


Or "how Samantha makes things much more difficult than they need to be."

About a month ago Audra at the Baker Chick posted a wonderful blood orange yogurt cake.  It sounded simply amazing and ridiculously easy to whip together.  The simplicity of the recipe was built around the 6 oz container of yogurt.  All of the other ingredients were measured using this container.  Easy peasy.   No need for measuring utensils.  Just a 3:2:1 ratio. Oh...and self rising flour.

Well...

I use yogurt a lot.  I have long ago given into purchasing the large tubs of plain yogurt instead of individual serving sizes.  So no 6 oz container to conveniently measure out my other ingredients.   To make matters more complicated, yogurt isn't sold by volume...it's sold by weight.  How to figure the volume of the other ingredients?

Ugh.  This is where the obsessive compulsive fabric dyer in me took over.  On a daily basis I convert units of measure and compare ratios to ensure the fabric I dye is consistent from one batch to the next.  Math.  Math everywhere.  This ratio of weight to volume was right up my alley...frustrating as it was.

After poking around I found that a cup of yogurt weighs roughly 8.6 oz...so 6 oz by weight of yogurt would be about 0.69 cups by volume.  (WHY do we use oz for weight and volume...things needn't be this complicated).  Multiplied by the units conveniently listed in Audra's recipe and voila...the measures listed below...within a few teaspoons...

Okay...I'll stop with the math.  Seriously...buy a 6oz container of yogurt...it will make the process so much easier!

Second problem...I don't have self rising flour.  Thankfully that's an easy enough fix.  Self rising flour is just boring old flour with salt and baking powder already mixed in..roughly 1 1/4- 1 1/2 tsp of baking powder and 1/2 tsp of salt per cup of flour. 

Now...I finally had a recipe.  And a bit of a headache from making things harder than they need to be.  This cake is certainly worth it.  And please do visit Audra's site to see the much less migraine-inducing method of measuring.

adapted from Sylvia Bors recipe via Audra at TheBakerChick

yields one 9-inch singe layer cake

The Ingredients:
for the cake
6 oz yogurt (or 1/2 cup + 2 Tbsp)
2 blood oranges, both juiced, one zested
1/2 cup + 2 Tbsp safflower oil or vegetable oil
2 eggs
2 cups all purpose flour
1 1/4 cup sugar
2 1/2 tsp baking powder
1/2 tsp salt

for the frosting:
1 cup whipping cream
1 tablespoon honey


The Process:
Preheat the oven to 350

In a large bowl, whisk together the yogurt,  orange juice, and oil.  Beat the eggs in one at a time until incorporated.  In a separate bowl sift together sugar, flour, baking powder and salt.  Mix the dry ingredients into the yogurt mixture, one third at a time, mixing thoroughly after each addition.

Lightly oil a 9" cake pan and line with parchment paper.  Pour the batter into the pan and smooth the top.  Bake for 30-35 minutes.  Reduce the oven temperature to 325 and bake an additional 10-20 minutes, depending on the oven.

Remove cake from pan and allow to cool completely.

While the cake cools, in a chilled bowl whisk the honey into the whipped cream.  Beat the cream until stiff peaks form.  Spread onto the cooled cake.

The Review:
After the headache of math and measuring I was almost immediately rewarded with the most amazing smells...lightly citrus and wonderfully cakey...

But my oven is finicky.  The center of the cake did not seem to want to set.  At the end of the full 20 minutes after dropping the temperature to 325 the toothpick finally came out clean...and the edges a little browner than I'd like.  I may have to bake the cake at 325 for the duration next time...or split the batter between two pans...

My cake mounded a lot in the center.  I suspect this may have to do with using fresher baking powder and all purpose flour in lieu of self rising flour whose leavening has been sitting for god knows how long.  The height didn't bother me in the slightest.  I may have obsessed a bit about the math, but not having a level cake.  Meh.

The flavors are so simple and clean.  And not overly sweet.  The whipped frosting was the perfect topping, creamy and ever so slightly sweet, without weighing down the cake or overpowering the citrus with cloying sweetness.   I'd love to try the cake again.  Perhaps with lemon.  And almond extract.  Or if I get really ambitious...layers...

I confess...I had some for breakfast.  Judging from the bit of frosting missing this morning I take it the cat did too...

It is that good.