Showing posts with label jams jellies and preserves. Show all posts

Tuesday, April 15, 2014

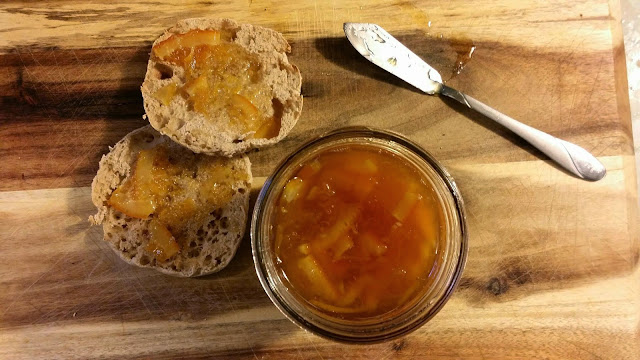
Hefeweizen Marmalade

Stir a little bit of booze into your breakfast! A marmalade has been on my "to create" list for a while now. The arrival of the Beeroness' cookbook finally prompted me to plough ahead. The chance to add beer or bourbon to a recipe is usually all the motivation I need.

Jackie recommends a hefeweizen, preferably one with notes of citrus and clove. A witbier, traditionally brewed with corriander and orange peel, would compliment the marmalade nicely, but I fear the more subtle beer notes would get lost among the sugar and citrus. Serve that one alongside for a lovely food pairing instead. Many pale ales will fit the bill, especially those with strong citrus notes. A saison would add a twist of spice. Steer clear of any uber hoppy beers, as the extensive boiling times may make for a very bitter marmalade.

I opted for Widmer's Hefe

recipe adapted from The Craft Beer Cookbook by Jacqueline Dodd

yields about 2 pints

The Ingredients:
2 - 12 oz bottles hefeweizen
1 lb (about 2) navel oranges
4 1/2 cups granulated sugar
1 Tbsp whole cloves
1/2 lemon, juiced and zest finely grated

The Process:
Thoroughly scrub the oranges. Using a mandolin or a very sharp knife, slice the oranges into 1/8-inch rounds. Remove and discard any seeds as you go. Stack the slices and cut into quarters or sixths.

Wrap the cloves in a cheesecloth bundle tied with kitchen twine.

In a large, heavy-bottomed saucepan, add the beer, oranges, sugar, and clove packet. Bring the mixture up to a simmer (about 190°F). Simmer for 5 minutes. Cover, remove from heat and let stand overnight.

Remove and discard the clove packet. Bring the mixture to a gentle simmer, about 180°F, and maintain for 1 1/2 to 2 hours. The orange rind should be tender and begin to turn transculent. After 2 hours, add the lemon juice and zest. Return the mixture to a gentle simmer, between 185°F and 200°F, for 20-30 minutes.

Place a small plate in the freezer.
Bring the orange mixture to full boil, and stir continually, until it reaches about 222°F.  Test the readiness of the marmalade by placing a teaspoon of the mixture onto the chilled plate and allowing it to sit for 30 seconds. Tilt the plate. The mixture should be a soft gel that moves slightly and will wrinkle when touched. If mixture is thin and runs easily, continue to boil until the marmalade reaches the gel stage.
Ladle into sterile jars, leaving 1/4-inch head-space. Gently stir to remove air bubbles. Wipe rims of jars clean and top with lids, screwing them finger tight (not TOO tight). Submerge filled jars in a water bath of boiling water and boil for 5-7 minutes (process times may vary by elevation).

Remove from water bath and allow to cool undisturbed for 12-24 hours.

Friday, February 15, 2013

Slow Cooker Juniper Chicken

Snowy, snowy days call for hot and hearty meals.  A day like today last Sunday necessitates making the most out of what is already in the pantry, because there would be no "quick" drive to the grocery store for any last minute items.  Thankfully, we had all of these items on hand.  Including the juniper berries.

Remind me to pick up more before the first of March...I'll need them to brine our corned beef..

adapted from The Biggest Book of Slow Cooker Recipes

serves 4

The Ingredients:
2-3 slices of bacon
3-4 carrots, cut into 1/2 inch pieces
2 stalks celery, cut into 1/2 inch pieces
1 small onion, cut into quarters
4 large chicken thighs, skinned
1/4 cup dry red wine
1/2 cup chicken broth
2 Tbsp instant tapioca 
1 sprig fresh rosemary
1 sprig fresh thyme
2 tsp juniper berries
salt and pepper to taste
1 cup frozen peas
2 Tbsp currant jelly

The Process:
Cook the bacon in a large skillet until crisp.  Drain, crumble and set aside.

Layer the carrots, celery and onions along the bottom of a 3 1/2 to 5 qt crock pot.  Place the chicken pieces on top.  Sprinkle bacon, rosemary, thyme, juniper berries, salt and pepper over the chicken.  In a small bowl, whisk together the wine, broth and tapioca.  Pour over the chicken.  Cook on low for 6-7 hours or on high for 3 to 3 1/2 hours.

Using a slotted spoon, transfer the chicken and veggies to a serving platter and keep warm.  Add the peas to the crock pot and cook for 5 minutes, or until heated through.  Whisk the jelly into the juices until smooth.  Spoon the resulting sauce over the chicken. 

Sunday, August 5, 2012

Bacon Jam

Yes.  You read that right.  Bacon.  Jam.  As in spreadable bacon.

Oh...and there is beer in there mix as well.

yields one pint jar

adapted from The Beeroness


The Ingredients:
12 oz bacon (8-10 strips)
4 cloves of garlic, minced
1/2 cup onion
8 oz amber ale
1/4 cup apple cider vinegar
3/4 cup brown sugar

In a large saucepan or dutch oven, fry the bacon until crispy.  Work in batches as necessary.  Alternatively, you can bake or microwave the bacon to the desired level of crispness.  Remove the bacon from the pan and blot off any excess drippings.  Allow to cool and then roughly chop. Reserve about 1 Tbsp of the bacon drippings and discard the rest.  

Add the dripping to the  pot along with the onions.   Cook the onions over medium-high heat until the onions become translucent and tender, about 3 minutes. Add the garlic and stir for about 30 seconds. Slowly add the amber ale and vinegar, scraping the bottom of the pot to deglaze.  Add  the brown sugar and the bacon.  Reduce the heat to simmer a simmer and cover, keeping the lid slightly tilted or offset to allow steam to escape.  Stir occasionally and cook until the mixture is  reduced to a thick and syrupy consistency, about 45-60 minutes. Transfer to a food processor and pulse until a coarse paste is formed.

Serve at room temperature.

Will keep in the refrigerator for about two weeks...if it lasts that long...

The Review:
There will be skeptics.  Let them be suspicious.  It will leave far more of the salty, meaty, slightly sweet and boozy wonderfulness all for you...

We tried it on burgers.  We tried it on biscuits.  We refrained from eating it by the spoonful.

Tuesday, March 27, 2012

Clementines Confites

A while back I stumbled upon the most riveting story of young love, gluttonous gourmandise, deep longing and a touching hint of guilt. It was the story of one woman's first experience with clementines confites.  The story was a wonderfully bittersweet ode to the syrupy sweet recipe to follow. I have been day dreaming about these perfect orange globes ever since...with only my mind's eye to fuel the obsession, having never tasted them before.  The blog story was my first encounter with the candied fruit.  So finally, just over two weeks ago, the perfect little citrus spheres started their long and sweet journey in my kitchen.

To make my life easier, and because I largely use grams and liters when I'm dying fabric at work, I stuck with metric measures.  The recipe detailed below is for one pound, or approximately 454 grams, of fruit.  Scale the recipe up or down accordingly...keeping the ratios of fruit, sugar, and honey the same.  I found the exact amount of water didn't matter so much as long as there was enough liquid to keep the fruit fully submerged. 

Need a hand with the math?  Shoot me a message...I'll gladly help you out.

Adapted from Lucy's recipe at Lucy's Kitchen Notebook

yields 1 lb/454 grams of candied joy

The Ingredients:
Day One
454 grams clementines
500 grams sugar
200 grams honey
water

Every Other Day Through 2 weeks
an additional 100 grams of sugar*

The Process:
Day One:
Pick the firmest, ripest fruit.  Scrub thoroughly to remove any dirt, waxes or impurities, leaving the skin completely intact.  With a long thin needle or a fine skewer, pierce each fruit deeply all over.  Liberally.  When you believe the fruit as been stabbed enough, pierce it another several dozen times. 

Select a large saucepan that will comfortably fit the fruit in a single layer.  Add the fruit and fill the saucepan with enough water to cover the fruit by 1 inch.  Bring the water to a boil, reduce heat ans simmer for 15-20 minutes.  The fruit should still be firm to the touch.  Using a tongs or slotted spoon, remove the fruit to a large, deep non-reactive (i.e. stainless steel or glass) bowl or jar. 

Add the 500 grams of sugar and 200 grams of honey to the liquid in the saucepan.  Stir to dissolve the sugar and bring the syrup to a rolling boil.   Promptly remove from heat.  Pour the hot syrup over the clementines, weighing them down with a plate if necessary to keep them fully submerged.

Loosely cover the bowl with plastic wrap and let sit undistributed for two days.

Every Other Day:
Remove the clementines from the bowl and transfer the syrup to a saucepan.  Add 100 grams of sugar to the syrup.  Bring to a rolling boil, remove from heat, pour over the clementines loosely cover and let sit for another 2 days.  Repeat this process every 2 days,  adding 100 grams of sugar to the liquid each time for two weeks.  The liquid will thicken and reduce slightly with each addition.  After two weeks has passed, transfer the clementines to a jar cover with their syrup and store in a cool dry place.  They will keep for as long as a year, getting better with age.

*all in all approximately 1200 grams or 2.6 pounds of sugar will be needed per pound of fruit

The Review:
Anticipation can be a blessing and a curse.  Your mouth waters at the thought of biting into a concoction after lovingly tending to it over the course of several days.  Sometimes the anticipation is just enough to whet the appetite, and the final product is beyond the expectations...all of the time and energy spend making each bite all the more rewarding.

Sometimes the anticipation builds and build and builds until it reaches a crescendo that the end result just doesn't life up to.  No amount of justifying or reasoning can bring the dish up to level it failed to reach in your mind.  Each bite becomes bittersweet.  You want so badly to love it, after everything that went into it, but no...expectations had been built up too high...

So where did these sugared citrus fall?  Right in the middle.  The first bite yielded a surprising bit of tart from the peel...not quite the candied peel flavor I was expecting.  The flavor was excellent.  Subtle orange without being overly sweet, despite the vast amount of sugar.  The texture, oh the texture....

This is where the treat failed.  Perhaps is was the variety of clementines.  The market is sadly overrun every year with tiny orange beauties boasting seedless enjoyment, ease of peeling and even sweeter flavors.  As the fruits as thus "perfected" they become genetic shadows of what they had been.  The insides had pulled back from the peel and had almost a dry feel...the pulp and flesh having shriveled slightly allowing the membranes to dominate.  None of the bitterness usually found in the membranes and pith was present, but the texture was a surprising let down.

I do attribute that largely to the fruit.  More time should have been spend on selecting the heaviest, firmest and most fragrant of the bunch.  The batch should have been started almost immediately...the four days on the counter may have allowed them to dry out too much before their sugar bath began.

But where else did this recipe succeed?  In the syrup, hands down.  After filling the jars with enough syrup to cover the fruit I still had nearly a quart of the golden liquid left.  It had a wondrous honey like consistency and a divine, yet subtle citrus flavor.  So far the syrup has paired well stirred into jasmine tea in lieu of honey, drizzled on top of star fruit and kiwi to compliment their tartness and added to oatmeal for a touch of sweetness.

The uses seem endless...the basis for glazes and marinades for meats, in place of simple syrup in cocktails, to top off ice cream, or to lightly sweeten frosting, filling or whipped creams...perhaps just by the spoonful...


I plan on letting the orange gems age a while longer before I exact the next one from the jar.  But in the meantime a little drizzle of the that syrup...
Thursday, February 9, 2012

Chocolate Waffles with Cherry Bourbon Compote and Fresh Whipped Cream

Please excuse this minor break in the regularly scheduled luau menu... 

Two weeks have passed since our last chance to enjoy Sunday morning waffles.  Since that time I've created a short list of combinations I am itching to try.  Chocolate waffles?  Breakfast for dessert, baby.  What better toppings to pair chocolate with than juicy cherries and velvety whipped cream.  You may never go back to syrup again...

the compote recipe is my own
the whipped cream recipe is adapted from BHG Cookbook
the chocolate waffles are adapted from Gale Gand's recipe at FoodNetwork.com

Makes 4-8 waffles, depending on the waffle iron.
The Ingredients:
6 Tbsp sugar
1/4 cup water
1/4 cup bourbon
3 Tbsp fresh lemon juice
1 lb (about 2 1/2 cups) fresh cherries, rinsed and pitted
1/2 tsp vanilla extract
1/2 tsp corn starch

for the whipped cream
1 cup whipping cream
2 Tbsp sugar
1/2 tsp vanilla

for the waffles
2 eggs, separated
3 Tbsp sugar
1 1/2 cups milk
1 cup all-purpose flour
1/4 cup cocoa powder, preferably Dutch-processed
2 tsp baking powder
1/2 cup salted butter, melted

The Process:
for the compote
In a medium saucepan combine water, bourbon, sugar and lemon juice. Bring to boil over high heat, stirring until sugar dissolves. Continue to boil until thin syrup forms, about 7 minutes. Reduce to simmer; add cherries and vanilla extract. Cook over medium heat, stirring gently for 5 to 7 minutes, or until the cherries soften, but retain their shape.  Remove cherries from the syrup with a slotted spoon and set aside in a serving dish.  Add the corn starch to the syrup, whisking until well combined.  Bring the syrup to gentle boil and cook until  thickened and reduced by half, about 5 minutes.  Pour syrup over cherries.  Cool, cover and set aside.

for the whipped cream
In a chilled bowl combine whipping cream, sugar and vanilla.  Beat with chilled beaters on medium speed until soft peaks form.  Set aside in the fridge.


for the waffles
Preheat oven to 200 and warm up the waffle iron

In a medium bowl whisk the whites by hand or with a mixer until soft peaks form.   Add the sugar and continue whipping until stiff.

In a medium bowl whisk the egg yolks and milk until well combined.  Slowly incorporate the flour, cocoa powder, and baking powder.  Add melted butter and mix until smooth. Gently old in the whipped whites, being careful not to overwork the batter.

Brush or mist the waffle iron lightly with oil and spoon batter into waffle iron, spreading quickly with a spatula to cover the entire griddle surface (amount varies depending on waffle iron, mine uses just over 1/2 a cup). Cook according to iron manufacturer’s instructions.

Transfer waffles to rack in oven to keep warm and crisp. Make more waffles in same manner.


The Review:
Pure unadulterated bliss.  Tart cherries; red, ripe and round.  Erupting with a juicy burst of bourbon.  Smooth, velvety whipped cream offering a rich douse of sweetness to cut the tang of the fruit and slightly bitter cocoa.  Wonderfully white and as pure and light as summer clouds.  And the dark platter of  decadence that supports it all...the rich chocolate waffle.


Taken together this combination is a force to be reckoned with.  And for the most part the components stand well on their own.  The only downside was the texture of the waffles.  For some reason this version did not puff up and retain its shape as well as previous waffles had.  The underside was nicely crisped while shielding a fluffy interior...the top side unfortunately remained slight soft and deflated quickly...no beautiful geometric ridges to contain the cherry studded heaven that the waffles supported.  With a tweak or two to make the waffle stand on its own, this may be the best Belgian inspired breakfast variation yet.

Wednesday, September 14, 2011

Stone fruit jam with cardamom


Growing up, I remember small jars of rich red-colored jam sealed with paraffin wax nestled in our refrigerator door. My grandmother made pints of plum jam every year and shared the bounty with the family. At first the tree in her backyard provided all of the fruit she needed. After the tree withered away, she continued the tradition by hunting down that specific variety of plum. Sadly, the recipe passed away with her.

In her memory, I wanted to concoct a stone fruit jam of my own. While I vividly remember how her cheery, wax-topped jars looked, I barely recollect the flavor. So I am on my own... However a generous pile of plums, apricots, nectarines and one lone peach remained from a recent family BBQ. I squirreled these summer gems home and created this heavenly jam in hopes of beginning a jam tradition of my own

the recipe is my own

yields approximately 4 one pint jars.

The Ingredients:
10-12 assorted stone fruits (about 8 cups chopped)
I used about 6 small plums, 2 nectarines, 3 apricots, and 1 peach
1 stick of cinnamon, about 4"
2 black cardamom pods
6 green cardamom pods
6 whole cloves
6 cups sugar
1/4 cup lemon juice

The Process:
Wash and rinse the fruit thoroughly. Do not soak. Remove stems and pits from the fruit and dice. Measure into large saucepan. Add sugar, lemon juice and whole spices.

Over medium high heat, bring to a boil while stirring constantly. Continue to boil until mixture thickens and the temperature reaches 220 on a candy thermometer. Test the jam's consistency by spooning a little onto a cold saucer and chill for a few minutes in the fridge. If adequately set it should wrinkle and feel firm.

Remove saucepan from heat and skim off any foam. Remove cinnamon stick, cardamom pods and cloves. Fill sterile jars with jam, leaving 1/4-inch head-space. Gently stir to remove air bubbles. Wipe the rims of the jars clean and top with lids, screwing them finger tight (not TOO tight). Submerge filled jars in a water bath of boiling water and boil for 5-7 minutes (process times may vary by elevation).

Remove from water bath and allow to cool undisturbed for 12-24 hours.

If properly processed the jam will remain good for several months, though the flavor will diminish after a year.

The Review:
The spicy aroma that filled my kitchen as the jam bubbled on the stove top was absolutely divine! The warm spices of cinnamon, cardamom and clove turned out to be the perfect flavor compliment. I could barely wait until the next day to try the jam on a batch of freshly baked biscuits. Pure heaven for breakfast! I had to restrain myself from eating the jam straight from the jar.

The stone fruit jam gelled up much better than my first peach jam attempt. While I prefer my jams and jellies slightly soft and soupy, those preferring a more solid spread may want to add pectin to their saucepans full of fruit.

This jam may not be grandma's, but I'm sure she would approve. And now I have four rosy jars of summer to see me through our cold, snowy winters.

Sunday, August 28, 2011

Peach Jam ^2


Summer has been generous with her bounty. Perhaps too generous. About a week back a friend came into possession of a crate of peaches. I eagerly agreed to take a dozen or so of the amber and russet colored gems off of her hands. And what better use of such a bounty of fruit than a jam to enjoy months down the road when summer's generosity is a fleeting memory to warm us through six months of cold and snow.

I had never made jam before. Nor had I attempted water bath canning. My food preservation is limited to a jar of crock pickles I made several years ago. However, my grandmother made a killer plum jam and I am bound and determined to honor her memory by honing my canning and jarring skills.

I made two variations of peach jam using the 12 peaches I was bequeathed. The first was a Spicy Peach with Thai Bird Eye Peppers. The second was a Ginger Peach. The basis of both are the same. I lacked pectin, so the end result is a tad runnier than most jam. While they may not be firm enough for toast or scones, to date these jams have been perfect for fillings, glazes, and sauces.

adapted from the guidelines and instructions at The National Center for Home Presesrvation

each variation makes approximately 7 half pint jars

The Ingredients:
6-8 medium peaches (about 6 cups when diced)
4- 4 1/2 cups sugar
2 Tbsp lemon juice

for Peach with Thai chili
2-3 bird's eye chilies, seeded and finely chopped
for Ginger Peach
3 Tbsp fresh ginger, finely minced

The Process:

Wash and rinse the peaches thoroughly. Do not soak. Remove stems, skins, and pits from fruit; cut into pieces and crush. Measure crushed fruit into large saucepan. Add sugar, lemon juice and flavoring of choice (ginger or peppers).

Over medium high heat, bring to a boil while stirring constantly. Continue to boil until mixture thickens. Continue to boil until the mixture reaches 220. Test the jam's consistency by spooning a little onto a cold saucer and chill for a few minutes in the fridge. If adequately set it should wrinkle and feel firm.

Remove saucepan from heat and skim off any foam. Fill sterile jars with jam, leaving 1/4-inch headspace. Gently stir to remove air bubbles, wipe rims of jars clean and top with lids, screwing them finger tight (not TOO tight). Submerge filled jars in a water bath of boiling water and boil for 5-7 minutes (process times may vary by elevation).

Remove from water bath and allow to cool undisturbed for 12-24 hours.

If properly processed the jam will remain good for several months, though the flavor will diminish after a year.

The Review:

Had I read up on jam making a little more thoroughly prior to diving in, I would have had pectin on hand before starting the process. The end result would have been far more firm. But this is merely a learning step in the process, and the end result was still absolutely amazing.

The Ginger Peach was far more successful than the Spicy Peach. The fresh ginger completely permeated the jam without overwhelming the peach flavor. It was warm and spicy without the bite that fresh ginger often has.

The spicy peach jam, however, was not so spicy. Thai bird eye chilies are fairly high on the Scoville scale, so I was hesitant to use too many. Either the heat all cooked out as I simmered the jam or they were not the peppers they claimed to be. The little flecks of chili in the jam gave off a very, very subtle after burn (if your palette is clean and finely tuned, any way) but overall it was a bit lackluster. But on the bright side, the peach shown through. What was to be spicy was still wonderfully fruity and sweet.


Sunday, August 14, 2011

Simple Stuffed French Toast


This morning I found myself with a leisurely amount of time to make breakfast along with a mostly untouched loaf of white- than-white bread, store-brand version of Wonderbread and a mason jar full of a friend's amazing homemade jam (courtesy of the fruit trees in her yard and the rest of summer's amazing bounty). Stuffed French toast was in the works...

This incarnation is far less fussy than many of the cream cheese, fruit jam and challah bread varieties out there. Really, mine were just glorified jam sandwich made from what my pantry had on hand. The homemade jam truly made up for the weak, flimsy bread I ended up using...

The recipe is my own. Though true inspiration is due to my friend Marcy and her amazing jam.

Serves 3

The Ingredients:
6 slices of bread
2-3 Tbsp jam of your choice
2 large eggs
1/4 cup milk
1 Tbsp sugar
1/4 tsp cinnamon
1/2 tsp vanilla
1-2 Tbsp butter
powdered sugar for dusting

The Process:
Spoon a scant Tbsp of jam on three of the slices of bread and spread within the edge of the crust, but not completely to it. Top each slice with a second to create a simple jam sandwich.

Whisk the eggs, milk, cinnamon and vanilla together and pour into a shallow bowl. Dip the jam sandwich into the egg mixture, coating both sides.

In a large skillet or griddle melt the butter over medium heat. Add the egg coated sandwiches and fry for 2-3 minutes on each side. Add more butter as needed.

Serve warm with a dusting of powdered sugar.

The Review:
This breakfast was the perfect way to showcase an amazing homemade jam without much fuss. I would, however, upgrade to a heartier bread next time around. But still, this was a nice twist on a tried and true traditional French toast. Though this stuffed version comes no where near the amazing guava stuffed version served at the Wailana Coffee House in Honolulu.