Wednesday, December 28, 2011

Plum Pudding with Bourbon Hard Sauce

We wish you a merry Christmas,
And a happy new year!

Good tidings we bring
To you and your kin.
Good tidings for Christmas,
And a happy new year!

Oh, bring us a figgy pudding,
And a cup of good cheer!

We won't go until we get some,
So bring some out here!

We wish you a merry Christmas,
And a happy new year!

What better treat to end the year with than a classic Plum pudding!  This is not an old world recipe, requiring twenty plus hours of prep or that hard or track ingredient, suet.  Rather, this steamed bread and fruit dessert is a little less involved, but just as pleasant.  And the bourbon hard sauce may be just enough to coax the  carolers to move along...or perhaps enticing enough to encourage them to stay. 

adapted from the BHG Cookbook

serves 8-10

The Ingredients:
for the pudding
5 slices of wheat bread, tron into small pieces
2/3 cup evaporated milk
2 egg whites, slightly beaten
1/2 cup packed brown sugar
1/4 cup cooking oil
1/4 orange juice
1/2 tsp vanilla extract
12 oz pitted prunes, diced
1/4 cup walnuts, chopped
3/4 cup whole wheat flour
2 1/2 tsp apple pie spice (cinnamon, allspice, ginger, nutmeg and cardamom)
1/2 tsp baking soda
1/4 tsp salt
for the hard sauce:
1/4 cup butter, softened
1 cup powdered sugar, sifted
1 Tbsp bourbon
"In half a minute Mrs Cratchit
entered--flushed, but smiling proudly--with the pudding,
like a speckled cannon-ball, so hard and firm, blazing in half
of half-a-quartern of ignited brandy, and bedight with
Christmas holly stuck into the top."  
--Charles Dickens, A Christmas Carol  
 
The Process:
In a large bowl, soak the bread in the evaporated milk for about three minutes or until the bread is softened.  Using a fork, stir the bread gently to break up the pieces.  Whisk in the egg whites, brown sugar, oil, orange juice, and vanilla.  Carefully fold in the prunes and walnuts.

In a medium mixing bowl stir together the whole wheat flour, spice, baking soda and salt.  stir into the bread and prune mixture until just combined.  

Lightly oil or grease a 6 1/2 cup tower mold or bundt pan.  Pour the batter into the mold.  Cover with foil; press foil tightly against the mold's rim.

Place the mold on a rack in a deep kettle.  Add boiling water to a depth of about 1-inch.  Cover the kettle.  Bring water to a gentle boil and steam for 1 1/2 to 2 hours for the bundt pan, or 2 1/2 to 3 hours for the tower mold.  Add more boiling water as necessary.  The pudding is finished when a wooden pick or skewer inserted in the center of the pudding comes out clean.

For the hard sauce, in a small bowl beat together butter and powdered sugar with an electric mixer on medium speed for 3 to 5 minutes or until the mixture is well combined.  Beat in the bourbon.  Spoon into a serving bowl and set aside.

Remove the pudding mold from the kettle.  Cool the pudding for 10 minutes and remove from mold.  Serve warm with bourbon hard sauce.

The Review:
Pudding is a deceptive term...this is more of a spice cake.  But the pudding tradition is one of streaming bread based treats instead of baking. This particular pudding was dense, moist and full or spice and bits of fruit.

While it wasn't presented in all of the glistening glory of Mrs. Crachit's masterpiece, for the newbie pudding maker, and those tasting a steamed bread pudding for the first time, this version is a safe introduction.  Next year's maybe the more ambitious Christmas pudding...

Tuesday, December 27, 2011

Turnip Puff

The entree for Chirstmas dinner was decided months in advance.   The sides needed a bit more time to percolate.  I love the classic spreads of stuffing, mashed potatoes, sweet potatoes, green bean casserol and rolls.  However even the traditions get a little to familiar.  A little stale and uninspiring. 

Turnips have many fans in this household, so we turned to this often over looked root as one of our featured side dishes.  The Better Homes and Gardens cookbook provided us with the puff recipe.  We had found a creamy root vegetable dish to replace the tried and true mashed potatoes.  Don't be fooled by the "puff" moniker, though.  It's less of a puff and more of a baked puree with a slight custard like consistency,

adapted from the BHG Cookbook

serves 4-6

The Ingredients:
1 lb trunips, peeled and diced into 1/2 inch cubes
1 large carrot, sliced
1 small onion, chopped
2 Tbsp butter
1/2 tsp salt
1/4 tsp pepper
1/8 tsp ground nutmeg
1/3 cup soft bread crumbs
2 eggs, slightly beaten


The Process
Preheat the oven to 375

Lightly grease a 1 qt casserole dish and set aside.  Layer the turnips, carrots and onions in a large saucepan and add water until just covered.  Cover the saucepanand boil the vegetable over medium high heat until very tender, about 12-15 minutes.  Drain. 

Transfer the vegetables to a large bowl.  Add the butter, salt, pepper and nutmeg.  Mash witha potato masher or beat with an electric mixer on low speed.  Add bread crumbs and eggs and mash or beat until smooth.

Pour the mashed vegetables into the prepared casserole.  Bake the preheated oven, uncovered, for 35 to 40 minutes or until a knife inserted near the center comes out clean.

The Review:
As I mentioned before, this household is a huge fan of this under utilized root.  While the flavors are incredibly mild, those who do not like turnips will probably not be won over by this preparation.  The puff itself has a mild cruciferous-like flavor, similar to boiled cabbage or steamed cauliflower; and is slightly sweetened and enhanced by the carrots.  The nutmeg and pepper nose through to lend a nice depth.  The texture is creamy and almost custard like.  One of our friends compared it in color and flavor to scrambled eggs, but smoother.  Alongside richer meats and sides, this puff compliments with its lighter body and mellower flavor.


In baking, because I needed to make this while the roast was still in the oven, I left the oven temperature at 325 for the roast.  The puff can cook at the lower temperature, but may need an additional 10 minutes or so.

Monday, December 26, 2011

Pork Crown Roast with Cherry Apple Stuffing

Christmas dinner, more so than Thanksgiving, calls out for grand presentation.   Growing up, no centerpiece on our family table seemed more grand than the crown roast.  A glistening ring of pork, each bone tipped with a quaint paper or foil cap...stuffing mounded and golden brown on top.  It seems so elegant.  So much time and care to craft something so magnicifent...

Despite not having many people over--no family up to visit, and friends off celebrating with their own-- I was bound and determined to make a glorious end to this first year of food blogging.  I went to a local butcher and ordered the roast.  Cooking the beast would be challenge enough; I wasn't prepared to trim, bind and french the loin myself.  The smallest cut I could procure was a 16 rib roast...weighing in at nearly 11 lbs.  Ross and I were going to eat like kings for days!

adapted from the BHG Cookbook

serves 12-16


The Ingredients: 
1 pork rib crown roast (12 to 16 ribs)
3/4 cups water
1/2 cup dried tart cherries
1/2 tsp instant chicken bouillon granules
1 stalk celery, diced
1 small onion, finely chopped
2 Tbsp butter
4 cups dry bread cubes (6 to 7 slices)
1 medium apple, chopped
1/4 tsp ground sage
salt and pepper to taste

The Process:
Preheat oven to 325

Trim the fat from the roast, or ask your butcher to do that for you.  Place the roast, bone tips up, on a rack in a shallow roasting pan.  Sprinkle the cavity and outer edges with a generous pinch of salt. Make a ball of foil and press it into the cavity to hold it open as it cooks.  Wrap the bone tips with foil.  Roast in preheated oven for 1-1/2 hours.

Meanwhile prepare the stuffing.  In a small bowl stir together hot water, cherries and chicken bouillion.   Let stand for 5 mintues.  Do not drain.

In a small skillet sautee the celery and onion in butter until tender and translucent, but not browned.

In a large mixing bowl, toss together bread cubes, apple and sage.  And the cherry mixture and sauteed onions.  Toss gently until bread cubes are moistened.  Season with salt and pepper to taste.  Add additional 1/4 cup of water or stock for a moister stuffing.

After 1 1/2 , remove roast from oven.  Remove the foil from the roast cavity.  Loosely pack stuffing into the center of the roast.   Cover stuffing loosely with foil.  Place any remaining stuffing in a lightly greased casserole.  Bake the stuffed roast an additional 45 to 60 minutes for a 6 lb roast or for 75 to 90 minutes for a 8-10 lb roast, or until a meat thermometer inserted at the thickest part of the roast registers 160. 

Add the casserole of stuffing to the oven for the last 45 minutes to heat through.

Remove roast from oven, cover with foil and let stand for 15 minutes.  This allows the juices to settle and redistribute throughout the roast.

To serve, spoon the stuffing out of the roast's cavity.  Slice the roast between each rib, and remove any cording used to bind the roast.


The Review:
Because our roast weighed in much heavier than the BHG's 5-6 roast, I needed to alter the cook time accordingly.  The lower heat and longer cook time did not dry out the meat in the slightest, though the stuffing may have suffered a bit from over doneness. 


The meat was tender, juicy and rich in its own pork flavors.  A thick band of beautiful white loin meat was attached to each rib, dripping with juices.  Just enough meaty goodness clung to the base of each rib to justify us gnawing on the bones like rabid dogs.  For as elegant as the roast looks, in the end, its' hard to eat while maintaining such refinement!  The sweet and tart stuffing complimented the roast well, but could have used a bit more salt and seasoning.  I do think the stuffing cooked in the casserole suffered of dryness.   I'd opt for a different bread than our multi-grain next time.  Perhaps a mixture of white, wheat, sourdough and rye.

The roast itself looks intimidating when first un-boxed.  In all honesty, this lovely (and pricey) piece of pork was no more of a challenge than a Thanksgiving turkey. 

Sunday, December 25, 2011

Cranberry Crumble Bars

Need a brief reprieve from all that sugar.  Icing laden sugar cookies, candy studded gignerbread and sugar dusted snikcerdoodles seem to dominate many a holiday table.  Very the smell of the confections is enough to send you into a sugar coma! 

These bars offer a slight break from the holiday hyperglycemia.  They are rich and buttery, slightly sweet and topped with a wonderfully tart cranberry layer. 

adapted from Smitten Kitchen via The Baker Chick.

Yields 24 bars

The Ingredients:
1 cup granulated sugar
1 tsp baking powder
3 cups all-purpose flour
1 cup cold unsalted butter (2 sticks or 8 ounces)
1 egg
1/4 tsp salt
Zest of one orange
2 Tbsp fresh squeezed orange juice
4 cups fresh cranberries
1/2 tsp cinnamon
2/3 cup white sugar
4 tsp cornstarch

The Process:
Preheat the oven to 375. Generously grease a 9×13 inch pan.

In a medium bowl, whisk together sugar,  flour, and baking powder. Mix in salt and orange zest. Use a fork or pastry cutter to blend in the butter and egg.  The  dough will be very crumbly. Press half of dough into the prepared pan.

In another bowl, stir together the 2/3 cup sugar, cornstarch and orange juice and cinnamon. Gently fold in the cranberries. Sprinkle the cranberry mixture evenly over the crust. Crumble remaining dough over the cranberries.

Bake in preheated oven for 30-40 minutes, or until top is slightly brown. Cool completely before cutting into squares.

The Review:
I brought these along with me to a friend's family gathering on Christmas Eve.  Everyone who tried the bars absolutely loved them!  The bars come together very quickly and were consumed almost as fast.  The crust and topping is  very basic and almost short bread like.  The crumbliness of it frustrated me at first, but these were far less stressful to make than the endless rolling and cutting of sugar cookies.

I imagine the simple buttery flavor of the dough would lend itself well to other fruit combinations.  Smitten Kitchen recipe original recipe used blueberries.  I imagine a raspberry,  bourbon peach, cardamom plum or lingonberry apple would be equally divine!

Thursday, December 22, 2011

Hermits

The holiday season begs for cookies to be made.  Tins packed to over flowing and exchanged between friends.  Colored frosting spattering counters and faces of happy kids.  Recipes swapped between co-workers.  I have one cookie tradition: ginger snaps.  It is time to add a new cookie to the repertoire.  Enter the hermit.

Given the Grinch-like spirit that seems to have descended upon me this holiday spirit, a cookie named hermit seemed appropriate.

Adapted from the recipe in my battle worn BHG Cookbook

yields 36 cookies


The Ingredients:
1/2 cup butter
3/4 cup packed brown sugar
1/2 tsp baking soda
1/2 tsp cinnamon
1/4 tsp ground nutmeg
1/8 tsp ground cloves
1 egg
2 Tbsp milk
1 tsp vanilla extract
1 1/2 cups all-purpose flour
1 cup currants
1/2 cup walnuts

The Process:
Preheat the oven to 375. 

Grease a cookie sheet and set it aside.

In a large mixing bowl beat butter until smooth.  Add brown sugar, baking soda and spices.  Beat until combined, occasionally scraping down sides of the bowl with a spatula.  Beat in the egg, milk and vanilla.  Add the flour, a little at a time, beating after each addition until well combined.  Stir in currants and walnuts.

Drop by rounded teaspoons onto the prepared cookie sheet, spacing the cookies about 2 inches apart.  Bake in preheated oven for ten minutes or until the edges are lightly browned.  Transfer to a wire rack and allow to cool.

The review:
The combination of spice fruit and chewiness makes these mounded cookies very reimenscent of traditional oatmeal raisin.  Yet they leave something to be desired.  They aren't overly sweet.  The spice sings of warm Christmas kitchen, yet these cookies failed to inspire much Christmas spirit.  Perhaps hermit is a more fitting name than I originally realized.  Or perhaps these poor spice cookies were over shadowed by the gingersnaps served alongside.

Overall...they are sort of "meh"

Tuesday, December 20, 2011

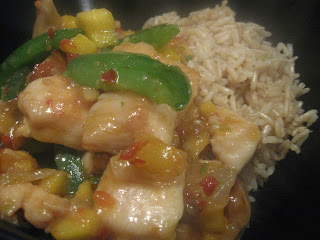
Chili-Mango Chicken

All of us have those stressful, rushed days when the last thing you want to do is spent a lot of time standing in the kitchen slaving over dinner.  But even on my most stressful days I'm more inclined to root through my cabinets than order take out.  Enter this recipe.  It has all the comforts of Chinese take-out, but is cooked up quicker than delivery would take, with the added satisfaction of having made a meal from scratch.

I first perused the recipe in one of Ross' Men's Health magazines and made a mental note of it should I want a quick, but impressive dinner.  The article boasts fridge to plate in 19 minutes.  Including time to cook the rice and a secret trick that makes the chicken silken and ridiculously tender, my dinner was on the table in less than thirty minutes.

adapted from Short Order Cook in Men's Health, October 2011

serves 4

The Ingredients:
1 pound boneless, skinless chicken breasts, cut into 1/2" pieces
2 tsp baking soda
1 Tbsp cornstarch
1 Tbsp low-sodium soy sauce
1/2 Tbsp sesame oil
1/2 Tbsp peanut or canola oil
1 red onion, finely chopped
1 Tbsp fresh ginger, minced
1 green pepper, chopped
1 mango, peeled, pitted, and chopped
1/2 to 2 Tbsp chili garlic sauce (I used Huy Fong)
Black pepper to taste

The Process:
Prepare rice as per your preference.

To tenderize the chicken combine the meat with baking soda in a medium bowl.  Allow to marinate for 10 minutes.  Thoroughly rinse the chicken and pat dry.

Combine the chicken, cornstarch, soy sauce, and sesame oil in a mixing bowl and let sit for additional 10 minutes.

Meanwhile, heat the peanut or canola oil in a wok or large skillet over high heat. Add the onion and ginger and cook for 1 to 2 minutes, until the onion is translucent. Add the green pepper and stir-fry for 1 minute more, stirring constantly. Add the chicken, along with its marinade, and stir-fry for about 2 minutes, until the meat begins to brown. Add the mango, 1/2 T chili garlic sauce, and black pepper.   stir-fry until the chicken is cooked through and the mango has softened into a near sauce-like consistency. Add additional chili garlic sauce until the desired heat is achieved.

Serve with rice.

The Review:
I may have been a little zealous with the chili garlic sauce on my first pass with this recipe.  Be sure to know your audience before dosing your dish with too much heat!  That being said, I loved the simplicity of the process and the ingredients.  The recipe is ridiculously quick and lends itself to many variations of meats and vegetables.  A spicy beef-broccoli, a  gingery shrimp with a kick, maybe a few cashew for extra crunch.  The marinade is simple enough to not over power the other flavors (unless of course you really pour on the chili garlic sauce) and will certainly compliment a wide range of ingredients.  The dish is filling while still being light.  And did I mention how simple it is?

And trust me on the baking soda marinade.  The step only takes another 10 to 12 minutes but it is the only method I have come across that creates that incredibly silken texture found in Chinese take out.

Added bonus for a dish truly from scratch...try making your own chili garlic paste

Saturday, December 17, 2011

Molasses Caramels

After my first few batches of honey caramels, I was on a role and looking for yet another variation.  Using the same cooking process and sugar/syrup/dairy ratio I tried my hand at maple caramels.  Something went horribly awry and I end up with a buttery granulated mess (which was salvaged to make many a cup of hot buttered rum over the next few days..)  I'm still not sure what went wrong. 

Back to square one.  So I tried molasses instead. 

The recipe is my own.

Yields approximately 60 one-inch caramels
 
The Ingredients:
1 1/2 cup granulated sugar
1/2 cup molasses
1 cup heavy cream
4 Tbsp salted butter
Salt to taste

And a CANDY THERMOMETER!

The Process:
Prepare an 8 x 8 pan by lining with aluminum foil or parchment paper and greasing generously with butter.  Do NOT use wax paper...the heat from the caramel will melt the wax paper to the candy.

Set a  large non-reactive pot set over medium-high heat.  Add the sugar and molasses to the pot and allow to dissolve, stirring or shaking the pot just enough to melt all of the sugar granules.  Continue to cook without stirring until the sugar and molasses dissolve into a bubbling liquid and the liquid just begins to smoke, but is not burning.

While the sugar caramelizes, heat the cream to a simmer in a medium saucepan.

Once the sugar and molasses reaches the level of caramelization you desire, cut in the butter, one piece at a time and stir gently until each piece has melted.  Carefully whisk in the warmed cream.  This stops the sugars from caramelizing.

At this point add additional salt to taste...to sample the molten liquid dip a spoon into the caramel and very quickly dip it into cold water to cool. 

Clip the candy thermometer to the edge of the pot.  Cook the mixture slowly until the temperature reaches 246 for soft caramels or 250 for firmer caramels. 

Pour the hot caramel into the prepared baking pan and allow to cool to room temperature.  Once cool, remove the caramel block from the pan, peel off the parchment or foil and cut into one inch squares.  Wrap in wax paper or cellophane. 

The Review:
These make a very rich, deeply-flavored, wonderfully colored caramel.  I am very partial to the flavor of molasses--there is something very nostagic about it--so I had a hard time boxing them up to ship away.  The slight bitterness of the molasses cuts the sweetness of the sugar so the end result isn't as cloyingly and tooth-achingly sweet as some caramels can be. 

Caramelizing the sugar can be a bit of a pain given how dark the molasses is.  If you aren't certain how far to heat your sugar and molasses in the first stage, try caramelizing the sugar with just a bit of water, cooking it to your desired amber hue and then stirring in the molasses.  An even richer layer of flavor rewards this extra step.

Honey Caramels

Candy making scares the bejesus out of me.  And corn syrup is often shunned in my kitchen.  Taken together it appeared homemade caramels were not to be in my near future.  However, after hearing about success after success from several friends who took the dive into candy making, I thought it was time.  This recipe is a lot simpler than I anticipated and uses not one ounce of the dreaded corn syrup.  Someday, when I am much more ambitious, I want to try several batches of these side by side using different varieties of honey...orange blossom, clover, buckwheat,  wildflower...

adapted from recipes at Brooklyn Farmhouse and Food on the food, with some extra help from Chez Pim

Yields approximately 60 one-inch caramels


The Ingredients:
1 1/2 cup granulated sugar
1/2 cup honey  (I used orange blossom)
1 cup heavy cream
4 Tbsp salted butter
Salt to taste

And a CANDY THERMOMETER!

The Process:
Prepare an 8 x 8 pan by lining with aluminum foil or parchment paper and greasing generously with butter.  Do NOT use wax paper...the heat from the caramel will melt the wax paper to the candy.

Pour the sugar and honey into a large non-reactive pot set over medium-high heat.  Allow the sugar and honey to dissolve, stirring or shaking the pot just enough to melt all of the sugar granules.  Continue to cook without stirring until the liquid caramelizes into a deep rich brown color.

While the sugar and honey caramelizes, heat the cream to a simmer in a medium saucepan.

Once the sugar and honey reaches the color you want, cut in the butter, one piece at a time and stir gently until each piece has melted.  Carefully whisk in the warmed cream.  This stops the sugars from caramelizing.

At this point add additional salt to taste...to sample the molten liquid dip a spoon into the caramel and very quickly dip it into cold water to cool. 

Clip the candy thermometer to the edge of the pot.  Cook the mixture slowly until the temperature reaches 246 for soft caramels or 250 for firmer caramels. 

Pour the hot caramel into the prepared baking pan and allow to cool to room temperature.  Once cool, remove the caramel block from the pan, peel off the parchment or foil and cut into one inch squares.  Wrap in wax paper or cellophane. 

The Review:
I'm in love.  The honey flavor certainly shines through. Though from subsequent batches I noticed that the less time you allow the sugars to caramelize, the more prominent the honey flavor.  Sugars not richly caramelized will have the crisp, clean and almost astringent honey flavor.  Sugar allowed to darken more mellows out and blends into the deeper caramel flavor with just a hint of honey flavor.  It is incredibly fun to play around with.

And while the caramels may be quick to make and eating the a bit of heaven...wrapping them is like a little bit of purgatory.  I'd recommend pre-cutting all of your wrappers while waiting for the caramels to cool and enlisting the help of a friend.

Wednesday, December 14, 2011

Semolina Pancakes (rava uthapam)

I adore cooking Indian food.  So when a friend asked me to make chicken tikka masala I happily obliged.   I had everything on hand to make the entree.  Unfortunately, I had no jasmine or basmati rice to serve on the side, nor did I have the patience for naan.  Thumbing through my Indian cookbook I found this quick starchy side.  It sounded absolutely perfect for sopping up the creamy sauce, AND I had the semolina on hand.

The original recipe can be made with farina (cream of wheat) instead of semolina, which may be more readily available for some.  Monica sprinkles the tops of her rava uthapam with tomatoes in addition to the red pepper and onion.  She also uses carom seeds on top for extra flavor and texture.  Carom is one spice I lack...so in its stead I sprinkled my pancakes with sesame seeds.  Cumin seeds also make a far substitute.

Adapted for The Everything Indian Cookbook by Monica Bhide

Makes 8 to 10 pancakes

The Ingredients:
1 cup course semolina flour
1cup plain yogurt
1/4 tsp baking powder
Salt to taste
1/4 tsp carom seeds
1/4 small red onion, finely diced
1 small red pepper, seeded and finely diced
1/2 tsp toasted sesame seeds

The Process:
In a medium bowl, combine the semolina and yogurt. Season with salt to taste.  Whisk in 1/4 to 1/2 cup water until the batter reaches the consistency of pancake batter.  Add the baking powder and mix thoroughly.  Allow to rest for 2o minutes.

In a seperate, small bowl, combine the red pepper and onion.

Heat a griddle or large skillet to medium high heat.  Grease lightly with oil.

Ladle about 1/4 cup of the batter onto the hot griddle.  As bubbles begin to form on the surface, sprinkle a small amount of onion/pepper topping and sesame seeds in the center of the pancake and flip (abut 2 minutes).  Cook the other side until golden brown, about 2 minutes.  Remove from griddle and cover to keep warm.  Repeat with remaining batter.

The Review:
These lovely little cakes came together with very little effort.  They have little flavor on their own, making them an excellent accompaniment to spicier entrees.  They are denser than western pancakes and heartier than naan.  They certainly held their own against our tikka masala!

I would love to make these again, but with different variations of toppings and spice.  If it weren't for the 20 minute rest period, I'd likely use them as a breakfast staple!  Such is the glory of a seemingly bland food...endless adaptability.

Saturday, December 10, 2011

Quinoa Stuffed Acorn Squash


I am bound and determined to like quinoa.  The grain itself has done absolutely nothing to offend me.  However its partners in crime when paired in recipes always seem to leave something to be desired.  This recipe did NOT include the lemon/dill combination.  A huge plus.  And it is served up in its own little bowl of acorn squash.  Also a plus.  AND the heat of a habanerno...just what you need as the temperature dips below freezing.

Adapted from the recipe at We are not Martha.

Serves 2 with a whole lot of left over filling

The Ingredients:
1 acorn squash
1 Tbsp butter
1 cup quinoa
1 1/2 cups vegetable stock 
1 Tbsp virgin olive oil 
1 small yellow onion, chopped finely 
4 garlic cloves, minced 
2 habanero peppers, seeds, removed and finely chopped finely  
1 cup mushrooms, chopped 
2 cups fresh leaf spinach 
1/2 cup feta, crumbled
1 Tbsp fresh parsley, chopped 
1 Tbsp fresh lemon juice

The Process:
Preheat the oven to 375.


Using a sharp knife, slice the acorn squash in half lengthwise and remove the seeds.  Sprinkle the cut half with salt and pepper and place a 1/2 Tbsp pad of butter into each half.  Place squash cut side up in a baking dish and roast for about 45 minutes or until tender.


Rinse the quinoa.  In a medium saucepan bring 1 1/2 cups vegetable stock to a boil and whisk in the quinoa.  Cover, reduce heat and simmer for 15-20 minutes.   


While the quinoa cooks, heat oil in a large skillet over medium high heat.  Add the onions, garlic, mushrooms and habanero.  Saute until slightly brown, 7-10 minutes.  Season to taste with salt and pepper.  Stir in lemon juice.


Reduce heat to low and stir in the quinoa.  Add the spinach and cook, stirring occasionally until spinach is just wilted.  Add the feta and parsley and stir to combine.   Keep warm until the acorn squash is done.


Spoon the quinoa mixture into the roasted acorn halves, mounding slightly.  Serve with a sprinkle of feta and parsley on top.


The Review:
This is a version of quinoa I adore and look forward to playing with in the future.  The two habaneros packed quite a punch leaving my noise running and tongue tingling, which I loved.  Others couldn't quite take the heat.  I may use serranos instead next time, and start with one. My mushroom averse husband was cranky about the rich fungus flavor, again an aspect I loved.  But yes, these is not a dish that hides the mushroom flavor well if you are trying to be sneaky.  Each flavor had it's moment from the earthy shrooms to the tang of the lemon, the kick of the pepper and the saltiness of the feta.  The squash offered a touch of sweetness while the quinoa blend everything together.  

I'm thinking leeks, red pepper spinach and pecan the next time around....

Saturday, December 3, 2011

Black Bean Turtle Brownies

My intern is leaving!  For several months he has shared same workshop and helped to keep me sane.  In honor of his last day, and as a thank you to all of the hard work done during the last three months, I crafted this spin on a recipe he first introduced me to....black bean brownies.

This gluten free, protein laden sweet is topped with toasted pecans, slathered in homemade caramel and drizzled with high quality chocolate.  If you couldn't sell others on the original black bean brownie, this version may be the key to winning them over.

adapted from my intern's recipe.

yeilds one pan (12 to 16 brownies)

The Ingredients:
for the brownie
1 - 15 oz can of black beans (preferably low or no sodium)
1/3 cup agave syrup
1/4 cup sugar substitute (truvia or splenda)
3 Tbsp vegetable oil
1/3 cup cocoa powder
1 tsp instant coffee
1 tsp baking powder
1 tsp vanilla extract
pinch of salt
3 eggs

for caramel:
1/2 cup honey
1/2 cup granulatewd sugar
2 Tbsp unsalted butter
1/4 cup heavy cream
1/4 tsp vanilla
1/4 tsp salt


for the topping:
1 cup toasted pecan, coarsely chopped
8 oz semi-sweet or dark chocolate

The Process:
Preheat the oven to 350.

Drain the black beans and rinse thoroughly. Add beans to a food processor and blend on high until a smooth puree is formed. Transfer to a large bowl. Whisk in agave, sugar substitute, oil, cocoa powder, instant coffee, baking powder vanilla extract and salt, and blend until just combined. Gently beat in the eggs, one at a time. The batter will be runnier compared to other brownie batters. Fold in chocolate chips. Pour the batter into a lightly greased, 8 x 8 inch baking pan.

Bake in preheated oven 30-35 minutes until the brownies begin to pull away from the side of the pan and a toothpick inserted in the center comes out clean. Set aside to cool.

While the brownies bake, prepare the caramel.  Warm the heavy cream in a saucepan to a gentle simmer ans set aside.  Melt the butter over medium heat in a heavy bottomed saucepan. Add the honey and sugar. Stir over medium heat until the sugar has mostly dissolved.Turn the heat to medium low. Using a candy thermometer cook the mixture over medium-low heat, stirring occasionally, until the mixture reaches the firm ball stage about 246.  Remove from heat and slowly stir in the cream and vanilla.  Allow to cool slightly.

While the brownies and caramel cool, toast the pecans in the preheated oven for 10-12 minutes.  Stir frequently...these can burn quickly if left unattended.  Sprinklr toasted pecans evenly over the brownies.   Pour the still warm caramel over the top of the pecan and gently spread into an even layer using a spatula.  Melt the chocolate in the micorwave or with a double boiler.  Spread over top of caramel.  Allow the brownies to completely cool, allowing the chocolate to set.

The Review:
Those who weren't easily fooled by health food parading as brownie couldn't get enough of these!  The pecans, homemade caramel, and chocolate gave the brownies just enough naughtiness to be indulgent and forgave the fact they were full of fiber and protein.  My gluten-free co-workers loved that they could share in this treat.  The pastry chef among them claimed he would friend me on facebook for the sole purpose of getting this recipe.  And the intern for whom the brownies were made claimed they were better than his...a true honor seeing as he was the one to provide the original recipe.  

Seriously.  Try these brownies already!

Friday, November 11, 2011

Black Bean and Pumpkin Soup

Rounding out our evening of pumpkin and beer...and adding a bit more substance to an otherwise carb-ridden table, was this black bean and pumpkin soup.  I first happened upon the recipe at Saucy and Bossy and had been waiting all fall for an oppertuner time to try it out.  When Ross annouced his next beer would be a pumpkin ale, I knew the soup's moment had come.

I added about twice as much pumpkin as either of the linked recipes used.  My pumpkin of choice was roasted and pureed from a fresh pumpkin...not canned.  But in a pinch either will work.  I also omitted the ham steak and used vegetable broth to make this a vegan/vegetarian friendly dish.

The recipe was also adapted for use in the slow cooker, as to be readily on hand throughout several hours of entertaining.

Adapted from the recipe posted at Saucy and Bossy, but originally from Smitten Kitchen

yields 9 cups

The Ingredients:
3 cans (15.5 oz)  black beans, rinsed and drained
1 cans stewed tomatoes, drained and chopped
1 medium red onion, diced
1 shallot, diced
5 cloves of garlic, minced
2 Tbsp ground cumin
1 tsp salt
1/2 tsp. fresh ground black pepper
3 Tbsp olive oil
6 cups vegetable, chicken or beef stock
2 cups pumpkin puree
1/2 cup sherry, cider or dry white wine
3-4 Tbsp red wine vinegar
additional slat and pepper to taste

The Process:
Combine drained tomatoes and black beans in a food processor.  Blend beans and tomatoes into a course puree

In large skillet, sautee onions, shallot, garlic, cumin, salt and pepper in olive oil until onion is beginning to brown and the cumin is fragrant.  Transfer onion mixture to a 6-qt slow cooker.  Stir in bean puree, stock, pumpkin puree and sherry.

Simmer the soup on high for 2-3 hours or on low for 4-6 hours

Just before serving, stir in the vinegar and season to taste with salt and pepper.  Garnish with sour cream and toasted pepitas.

The Review:
I really wanted to like this soup.  I really truly did.  I make several varaiations of black bean soup throughout the colder months and hoped this incarantion would add a welcome diversion from my cumin studded, chili-like line up.

It wasn't as new and exciting as I had hoped.  The dominate flavor was most assuredly the cumin.  I adore cumin, but I can't seem to avoid a black bean soup that relies on this spice.  The pumpkin was present, but in more of supporting role than leading actor.  The textures were good, though a bit smooth for my taste.  The sherry did add a lovely bright finish to the dish, but only when ladled freshly after adding.  Allowed to simmer longer in the crock pot, it's clean bite quickly faded.

More pumpkin, less bean.  Less cumin.  And sorry vegetarians...I think the soup needs the beef stock for that added depth.  And the ham steak for more interest.  Better yet...stock made from a ham shank...now I know what to do with those holiday leftovers.

Tuesday, November 8, 2011

Pumpkin Monkey Bread

What else could we serve to compliment our pumpkin beer and waffles?  Why, monkey bread of course!  Ross came across this recipe while we were brainstorming about what types of food to serve with the pumpkin ale debut and requested I made it.  This is the second monkey bread he has requested.  Is that a hint?

As with the waffles, I used fresh pumpkin puree; but I'm sure canned pumpkin would work as well.

adapted from Tracey's recipe at Sugarcrafter

Makes one loaf

The Ingredients:
For the bread dough
3 1/4 cups flour, plus extra for kneading
1/2 tsp salt
1/2 tsp cinnamon
1/4 tsp nutmeg
1/8 tsp cloves
2 Tbsp unsalted butter, melted
1/2 cup warm milk (105° - 115° F)
1/4 cup warm water (105° - 115° F)
2/3 cup pumpkin puree
1/4 cup sugar
2 1/4 tsp active dry yeast (about 1 pkg)

for the coating:
1 cup sugar
2 tsp cinnamon
3/4 stick butter, melted

for the glaze:
2/3 cup powdered sugar
2 Tbsp pure maple syrup
1-2 tsp milk

The Process:
In a large bowl, whisk together the flour, salt, and spices.

In another large bowl, whisk together the milk, water, pumpkin, melted butter, sugar, and yeast.

Make a well in the center of the flour mixture and add in the wet ingredients. Using a wooden spoon, gently stir until the dough comes together. Turn out on to a lightly floured surface and knead until smooth and elastic, about 10-15 minutes. Form the dough into a ball and set inside a clean bowl lightly sprayed with cooking spray.  Cover with a clean towel and set in a warm spot to rise.  Allow to double in size, about one hour.

In a small bowl mix together the cinnamon and sugar, and melt the butter for the coating. Spray a bundt pan with cooking spray. Once the dough has risen, shape the ball into a large rectangle. Using a sharp knife, cut the dough into roughly equal-sized pieces and roll each piece into a ball, roughly 1-inch to 1 1/2 inch in diameter.  They needn't be the uniform, but aim to have between 35 and 45 balls.

Dip each ball of dough into the melted butter and then gently roll in the cinnamon-sugar mixture. Layer the coated dough balls in the bundt pan as you go.

Once you’ve coated and layered all of the dough balls, cover the bundt pan and let the dough rise for another hour.

Preheat the oven to 350 degrees.

Bake the bread until golden brown, 30-35 minutes. Let cool for 5-10 minutes before turning out on to a platter.

While the bread cools make the glaze by whisking together the powdered sugar and maple syrup. Add milk one tsp and a time until you achieve the desired consistency.  Drizzle over the bread while it’s still warm.

The Review:
What's not to like about monkey bread?  Especially the sweet varities?  It is warm and spicy.  It makes your kitchen smell devinine.  It's name is fun to say.  You eat it with your fingers.  And it make a wonderful breakfast the next morning.  No wonder Ross keeps requesting these yeasty gems!

I had more little balls of dough than the original recipe yielded (she managed about 40).  I suspect this was due to smaller cuts on my part.  As a result I ran out of butter and cinnamon sugar to roll the dough balls in pretty quickly and needed to prep more. 


Overall a marvelous bread.  It makes me wonder how pumpkin cinnamon rolls would go over...

Monday, November 7, 2011

Pumpkin Waffles

Beer and waffles.  This was a treat to look forward to whenever a co-worker in Honolulu had a new batch of his home brew ready to try.  In the spirit of those gatherings, and to compliment Ross' Pumpkin Spice Ale, may I present...

Pumpkin waffles.

Smitten Kitchen is another food blogger I love to follow, though I do not often use her recipes.  That may change in the near future.  These waffles a little more time consuming to make if you are used to the Bisquick variety, but trust me, these are well worth it.  Once the batter is made, making the waffles is a breeze.  I did purchase a waffle iron for the sole purpose of this recipe, by the by.  Be sure to take the time to condition your iron BEFORE your first waffle attempt is poured onto the hot griddle surface.

adapted from the amazing recipe at Smitten Kitchen

Yields a lot of waffles

The Ingredients:
2 1/2 cups all-purpose flour
1/3 cup packed light brown sugar
2 1/4 tsp baking powder
1 tsp baking soda
1/2 tsp salt
2 tsp ground cinnamon
1 tsp ground ginger
1/4 tsp ground cloves
4 large eggs, separated
2 cups buttermilk, well shaken
1 cup pumpkin puree, canned or homemade
6 Tbsp unsalted butter, melted
Vegetable oil or cooking spray for brushing waffle iron

The Process:
Preheat oven to 250°F and preheat waffle iron.

Sift together flour, brown sugar, baking powder and soda, salt, and spices. Whisk egg yolks in a large bowl with buttermilk, pumpkin, and butter until smooth. Whisk the dry ingredients into the wet ingredients until just combined.

In a mixing bowl with a whisk attachment, or by hand with a strong wrist action, whisk the egg whites until they hold soft peaks.  Fold the whites gently into the waffle batter, until just combined.

Brush or spray the waffle iron lightly with oil and spoon batter (amount varies depending on waffle iron) into waffle iron, spreading quickly. Cook according to manufacturer’s instructions.

Transfer waffles to rack in oven to keep warm and crisp. Make more waffles in same manner.

The Review:
An amazing aroma overtook the entire house while I made these.  All breakfast and baked goods and pumpkin pie spiced....

If you like a good homemade Belgian waffle, dig in.  Just a little bit of butter goes a long way to supplement these spice laden grids.  Wiped cream, syrup, powdered sugar could all be used to dress these up, but I found them divine on their own.  Light and fluffy in the center.  Crisp on the edges. Full of wonderful fall flavor. And what a pairing with Ross' ale! 

Beer and Waffles live on!

Friday, November 4, 2011

Caramel Apple Pie

Have you been to the Baker Chick?  You should, particularly if  you have a sweet tooth.  Audra's recipes are classic, classy and served up with a twist of her own and a marvelous smile.  Her photos are stunning and her anecdotes will lighten your day.  This recipe was inspired by her passion for salted caramels and a gorgeous crop of apples I had sitting on my counter.  Unlike traditional apple pies, there is no need to add butter or sugar to the pile filling.  The caramel sauce will provide all of the buttery sweetness you need.

Caramel sauce from Audra's Banana Caramel Brownie recipe at the Baker Chick
The pie recipe is my own


The Ingredients:
For the caramel:
6 Tbsp butter
3/4 cup sugar
1/2 cup heavy cream
1/2 tsp vanilla extract
1 tsp kosher salt

For the pie:
1 recipe for a single crust pastry
6-8 apples, peeled, cored and sliced (about 4 cups)
1 Tbsp lemon juice
1 Tbsp corn starch
1 tsp cinnamon

For the topping: 
1/2 cup packed brown sugar 
1 stick butter, soft 
1 cup all-purpose flour
1/2 cup old-fashioned oatmeal

The process:
For the caramel sauce:

Melt the butter in a heavy sauce pan over medium-high heat.  Add the sugar and stir frequently until sugar is a golden brown.  As soon as the sugar reaches the desired color and starts to smoke, remove it from the heat.  Carefully whisk in the cream, it will bubbly up and produce a lot of steam.  Slowly add the vanilla and salt.  Allow the caramel to cool while you prepare the crust, filling and crumb topping.

Preheat the oven to 350

While the caramel sauce cools, combine the apples, lemon juice, corn starch and cinnamon in a large bowl.  Toss to coat and set aside.


Prepare the crumb topping by combining the softened butter, brown sugar and flour with clean fingers or the tines of a fork until a coarse crumb forms.  Mix in the oatmeal and set aside.


Roll out the pastry and line in a 9 inch pie pan.  Mound the apple filling into the crust.  Drizzle the cooled caramel sauce on top.  Evenly spread the crumb top over the filling.  Bake the pie uncovered for 50-60 minutes until the filling is bubbly and the crumb top is lightly browned.  Allow to cool to almost room temperature before serving.

The Review:
I've tried this sauce on many other occasions and the flavor and richness is astounding.  However, in this recipe it doesn't quite seem to hold its own.  As a sauce it turns out to be a but too thin and unstable for this type of baked good.  The pie was amazing, don't get me wrong, but where I was hoping for a rich burnt sugar flavor and rich caramel thickness, I was rewarded with a sweet and buttery ooze of apple filling.  


The pie needs to cool off substantially for the caramel sauce to set up again.  If you are impatient the pie with reward you with a soupy sea of filling pouring all over your serving plates.  (The lovely slice pictured above was taken the next day...after the pie had been in the fridge overnight).  


I absolutely loved the crumb topping, though.  The whole pie was marvelous, but this topping will lead me to try this pie again...perhaps using Audra's candy caramel recipe next time in lieu of the sauce.

Wednesday, November 2, 2011

Broccoli Cheese Chowder

We've had a blessedly lengthy fall before winter's chill descended upon us.  But now as the cold creeps in under our doors, so do cravings for thick and creamy soups.  This broccoli cheese chowder, as the recipe is written, reads more like a cream of broccoli soup.  The chowder was much improved by using fresh broccoli and by not blending the result into a homogenous mess.  It's a chowder afterall...you should be able to see the veggies among the creamy cheddar laced base.

Adapted from Taste of the South recipe fall '07

serves 4 to 6

The Ingredients:

2 Tbsp butter
1 large yellow onion, chopped
3-4 cloves of garlic, minced
4-1/2 cups chicken stock
2-3 russet potatoes, peeled and diced
3 stalks of broccoli, cut into bite-size florets
1-1/2 cups heavy cream
1-1/2 cups shredded Cheddar cheese
1-1/2 tsp salt
1 tsp ground white pepper

The Process:
In a large stockpot over medium-high heat combine butter, onion, and garlic. Saute for 3 to 4 minutes, or until the onion is soft.  Add the chicken broth and potatoes; simmer for 15 minutes, or until potatoes are soft.  Add broccoli florets and return to a simmer; cook for 6 to 7 minutes, or until broccoli is tender.
In a blender or food processor, puree approximately half of the soup in batches until mostly smooth. Return the puree to the remaining soup, return to a simmer over medium-heat.
Stir in heavy cream, cheese, salt, and pepper. Cook over low heat until soup is barely bubbling and the cheese has completely melted.
Garnish with additional shredded Cheddar cheese, if desired. 
The Review:
Fresh broccoli and visible bits of potato are a vast improvement to the original.  The cream and cheese was just enough to thicken and enrich the chowder without making it too heavy.  Of course it wouldn't be chowder without the cream.  I am curious to try it again with another variety of cheese.  Or two...


Sunday, October 30, 2011

Sage and Apple Pork Chops

I was in need of a quick-to-assemble dinner.  Not quick to cook, mind you, but quick to put together and toss in the oven.  And it had to use items on hand.  For some reason I had been craving the savory taste of sage.   Perhaps it was our lingering fall.  Something about sage, onions and apples screams fall...

The recipe is my own

Serves 4

The Ingredients:
4 bone in pork chops
2 medium apples, cored and thinly sliced
1 small onion, thinly sliced
1 tsp cinnamon
1-2 tsp ground sage
salt and pepper to taste


The Process:
Preheat the oven to 350.

Lightly oil a 9x13 baking dish and arrange the apple slices in the bottom.  Liberally dust with cinnamon. 

Meanwhile, sear the pork chops on both sides in a hot skillet...2-3 minutes per side.  Arrange the seared chops on top of the apples.  Sprinkle with sage, salt and pepper.  Layer the sliced onions on top.

Bake uncovered in the pre-heated oven for 35-40 minutes or until the chops are slightly pink or reach about 145 degrees.

To serve, portion out one chop to each plate and top with baked apples an onions.

The Review:
Simple, juicy savory and sweet.  This dinner was nothing to exciting, but it certainly hit the spot.  The apples disintegrated into nearly a sauce.  The pork was tender and flavorful.  The seasoning was low key, but well balanced.  Pretty pedestrian.  But very satisfying.

Sunday, October 23, 2011

Chicken and Sweet Potato Stew

Oh for the chance to cook a decent dinner once and again!  Life has become ridiculously busy over the past weeks (as my more faithful follows may have noticed due to the lapse in postings...trust me, it's not for lack of cooking or interest so much as lack of time in front of the computer).  Short of the odd gathering or forced night with company I haven't focused on many entrees of late.  But when I came across this recipe I knew I'd have to make the time.  Though with a crock pot in the mix, I was free most of the afternoon to carry on with my overbooked list of projects, with the satisfaction of knowing a hot dinner would await me in a few hours.

Adapted from Eating Well, March/April 2006

Serves 6

The Ingredients:
6 bone-in chicken thighs, skin removed, trimmed of fat
2 lbs sweet potatoes, peeled and cut into spears
1/2 lb white button mushrooms, thinly sliced
6 large shallots, peeled and halved
4 cloves garlic, peeled and sliced
1 cup dry white wine
2 tsp chopped fresh rosemary
1 tsp salt
1/2 tsp freshly ground pepper
1 1/2 Tbsp white-wine vinegar

The Process:
Layer the chicken, sweet potatoes, mushrooms, shallots, garlic, wine, rosemary, salt and pepper in a 6-quart slow cooker. Put the lid on and cook on low until the potatoes are tender, about 5 hours. Before serving, remove bones from the chicken, if desired, and stir in vinegar.

The Review:
I was amazed at the simplicity and elegance of the dish.  I was wary to layer so much with so little liquid, but as everything cooked down over the 5-6 hours, a wonderful broth emerged.  The sweet potatoes needn't be stirred or submerge to cook fully.  The chicken stayed picturesquely intact but fell from the bone in tender forkfuls.  The broth was cloudy but clean.  A picture perfect dinner with very little effort.

The flavors were light and earthy.  Meaty chicken, savory rosemary, tart and slightly sour broth from the wine and vinegar underscored with an earthiness from the mushrooms.  Despite these being run of the mill white button mushrooms, they lent quite a bit of flavor.  While our mushroom-phobe was able to pick around the slices of fungi, he did complain about the flavor lingering  the dish.

Monday, October 10, 2011

White Bean and Tomato Bruschetta

The highlight of the bruschetta bar, at least for me, was this little gem right here.  Our event was kicking off an evening of drinking and revelry, and while finger food doesn't offer much by way of substance, I was bound and determined to have something with a little more protein to sate us.
Adapted from a Bon Apetit recipe found at Epicurious

yields about 20 servings

The Ingredients:
1 cup dried Great Northern beans (or one can, drained and well-rinsed)
3 plum tomatoes, seeded, chopped
1/4 cup pitted Kalamata olives, chopped
4 Tbsp olive oil
1/4 cup chopped fresh basil
2-3 cloves garlic, minced
salt and pepper to taste

The Process:
If using dry beans: beans in large saucepan. Add enough cold water to cover the beans by 3 inches. Bring to boil. Cover and remove from heat. Allow the beans to stand 1 hour.  Drain beans and return to pan. Add enough cold water to cover by them 3 inches. Bring to boil. Reduce heat and simmer until tender, stirring occasionally, about 1 hour. Drain and cool. 

Transfer cooked (or canned) beans to medium bowl. Add in tomatoes, olives, 4 tablespoons oil, basil and garlic. Mix until well combined.  Season to taste with salt and pepper. 

Serve cold or room temperature with crostini.

The Review:
The flavor and texture of this simple topping was astounding.  Fresh red-ripe fall tomatoes, smooth and creamy white beans, salty olives and just enough seasoning to tie everything together....heavenly.   I went a little heavier on the bean than the recipe called for, but with no regrets.  

The original recipe suggests serving by spreading freshly toasted slices of French bread with a goat's cheese such as Montrachet and then topping with the bean mixture.  While I'm sure this would have added an even more exquisite depth of flavor and a wonderful play of warm crisp toast against cool and creamy toppings, we opted to keep it simple and remove the broiler and cheese from the equation.  That's quite alright.  This meant I was able to savor a lovely bit of Montrachet on my own some days later.


Sunday, October 9, 2011

Triple Olive Tapenade

This was the second topping offered for our bruschetta bar.  I absolutely adore olives of all varieties.  This recipe is a great way to showcase your favorites.  Ross absolutely abhors olives.  That left more for the rest of us....

Adapted from Alton Brown's recipe at Foodnetwork.com

yields approximately 1 to 1-1/2 cups

The Ingredients:
1/2 pound pitted mixed olives (I used green stuffed with pimetto, black, and kalamata)
2 anchovy fillets or 1 tsp anchovy paste
1 small clove garlic, minced
2 Tbsp capers
2 to 3 fresh basil leaves
1 Tbsp freshly squeezed lemon juice
2 Tbsp extra-virgin olive oil

The Process:
Thoroughly rinse the olives in cool water. Place all ingredients in the bowl of a food processor. Process to combine, stopping to scrape down the sides of the bowl, until the mixture becomes a coarse paste, approximately 1 to 2 minutes total. Transfer to a bowl and serve.

The Review:
The spread was pungent, salty, briny and acidic in all of the right ways.  Some may scoff or turn they nose up at anchovies, but was is a good Caesar dressing or salad nicoise without the salty little morsels.  Likewise for this delightful spread.  The fish, capers and lemon juice serve to deepen and enhance the olives' flavors without overpowering them.  As this was the first time I'd ventured to use anchovy paste, I did err on the light side, lest the little fish dominate the salty balance.  The spread was a thick and coarse consistency, mounding onto the crostini well, without falling apart; moist without saturating the little toasts.  The tapenade served as a wonderful compliment to the sweeter tomato brustchetta toppings.

This appetizer is incredibly quick to prepare and fairly inexpensive (depending on your olives of choice, that is).  I am looking forward to perusing our local cheese shop's olive bar for the next assortment of olives to try...

Saturday, October 8, 2011

Double Tomato Bruschetta


At a recent opening night party for work we were treated to a spread of savory Italian finger foods. The highlight of the Mediterranean treats was the bruschetta bar. Large bowls of lightly toasted bread headed a table filled with about half a dozen varieties of tasty toppings. I was itching to have an excuse to set up something similar. Double tomato bruschetta is the first of the three I treated out guests to on the chosen night.

Adapted from Laurie Thompson's recipe at Allrecipes.com

The Ingredients:
for the toasts:
1-2 day old baguettes
olive oil

for the topping:
6 roma tomatoes, chopped
1/2 cup sun-dried tomatoes, packed in oil, chopped
3 cloves garlic, minced
1/4 cup olive oil
2 Tbsp balsamic vinegar
1/4 cup fresh basil, chiffonade
1/4 tsp salt
1/4 tsp ground black pepper
The Process:
For the toasts:
Preheat the oven to 450.

Slice the baguette on a diagonal about 1/2 inch thick slices. Coat one side of each slice with olive oil using a pastry brush. Arrange slices in a single layer on a cooking sheet, olive oil side down. Place a tray of bread slices in the oven on the top rack. Toast for 5-6 minutes, until the bread just begins to turn golden brown.

Allow to cool.

for the topping:
In a medium bowl combine the two types of tomato, garlic, oil, vingear and basil. Season with salt and pepper to taste.

to serve:
Arrange toasted bread on a serving platter. Carefully top each slice with a spoonful of the tomato mixture. Alternatively, set the toasts in a large basket at the table alongside a serving dish of the tomato mixture and allow guests to create their own bruschetta.

The Review:
The sun-dried tomato added a deep and slightly sweet taste that brought a pleasant and rich tomato flavor to their anemic Roma relations. The vinegar likewise added a sweet hint, making me wish I had added just a touch more salt to balance the flavors out.

These little toasts could just as easily be finished off with a touch of mozzarella and a minute or two under the broiler, but with people coming and going the serve yourself bruschetta bar seemed to result in much fresher flavors. And no soggy toasts were to be found from bread topped too soon. Overall this double tomato bruschetta was a big hit, though not the favorite of the evening.

Thursday, October 6, 2011

Miso Glazed Eggplant


I love eggplant but often find myself in a rut over how to prepare it. The Mediterranean standbys grow old and a bit to familiar. But while flipping through one of Ross' Men's Health magazine, an article jumped out about dressing up your veggies. Asian condiments and a hot broiler seemed a good fix for the eggplant rut.

adapted from "A Meat Lover's Guide to Vegetables" in Men's Health, October 2011

The Ingredients:
1 medium eggplant, cut lengthwise into 1/2 inch slices
2 Tbsp shiro (white) miso
1 Tbsp honey
1/2 Tbsp rice wine vinegar
1/2 Tbsp soy sauce

The Process:
Preheat the broiler.

Lightly brush both sides of the eggplant slices with vegetable or olive oil Line a baking sheet with foil and arrange the slices in a single layer.

Combine the miso, honey, vinegar, and soy sauce along with a dash of pepper. Whisk until well blended. Brush the sauce on the exposed sides of the slices.

Broil the eggplant 6 inches from the heat until the sauce is caramelized, about 3-4 minutes. Flip the slices, brush with exposed sides with sauce and broil 3-4 minutes more.

Remove the eggplant to a serving platter and brush with remaining sauce before serving.

The Review:
I adored the miso glazed salmon I tried a few months back. The fish had a lovely balance of sweet, salty and umami. The eggplant, though, lacked something. The funk of the miso seemed to overpower the honey and soy sauce instead of blending with it. The sauce didn't seem to caramelize as promised, so much as brown and burn. And while I have enjoyed many silky or meaty textures of eggplant, depending upon how prepared, this incarnation seemed almost slimy.

Next time perhaps the smaller Japanese eggplants are in order. And a bit more tweaking with the sauce ratio. There is always room for improvement, and never a failure without the chance for later success.